Reference material is invaluable to artists of any level of experience and should always be a part of your workflow for designing 3D models. A few settings are associated with these images when imported into your 3D viewport.
To edit an image that has been imported into your 3D view, go to the properties panel, and then select the object data properties tab to display all the settings of the specific object type, provided it has been selected. You can also control basic transforms like rotation and scale as you would standard mesh objects.
Any object type can be edited to some degree in Blender, including image objects. But what are these options, and how can they help to improve an artist’s workflow when working with reference material?
Adding Your Reference Image?
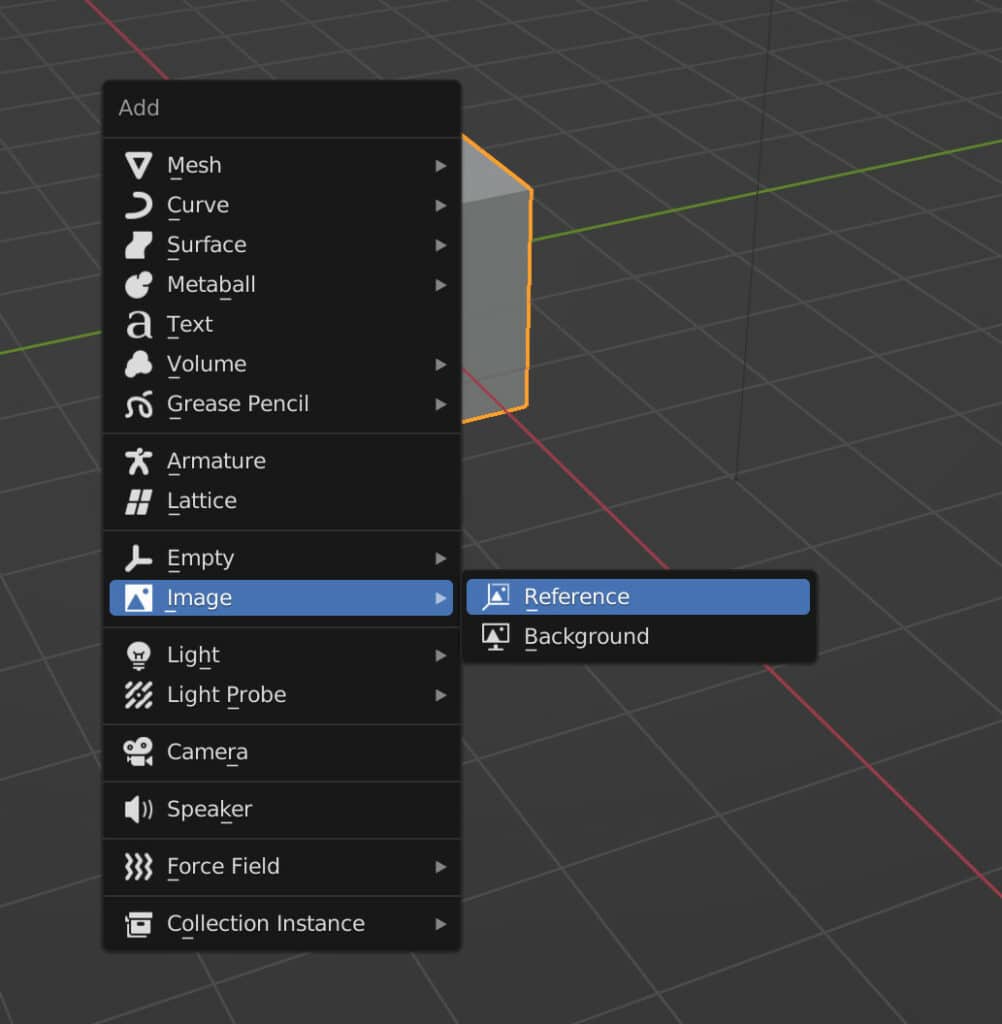
Before we can begin editing our images, we need to add them to our 3D viewport. To import your reference material, open up the add menu using the hotkey Shift + A, then go to the image option to highlight the second menu.
From this menu, select reference, and this will open the file browser. Choose the image you wish to import, select it, and then click on the open image button. This should import your reference image into the 3D viewport.
What Is An Image Object?
In Blender, we have many different object types that we can work with. These object types range from mesh objects the text objects. Some of these object types can be rendered while others cannot.
Now while Image is an option in the add menu, it is also technically a form of an empty object.
Empty objects are often used to create relationships between various models. An empty can come in various shapes, such as primitive objects like cubes and cylinders or even images.
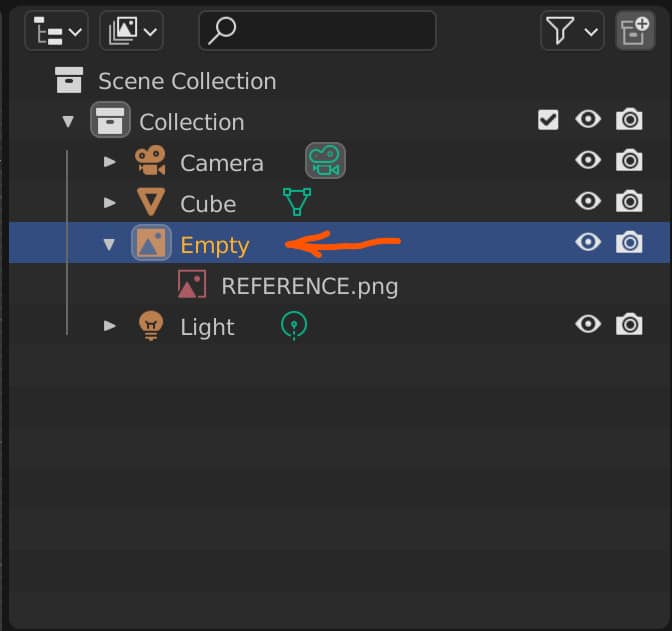
Because an image object is technically classed as an empty, it cannot be rendered. It also shares many of the other traits that empty objects possess. For example, it is possible to parent other objects to an empty and vice versa.
This can be useful if you plan to move objects around while still editing them, as you can parent an empty to its main object. And then, when you move the object, the empty, which in this case is the reference material, will move with it.
The Transforms Of The Object
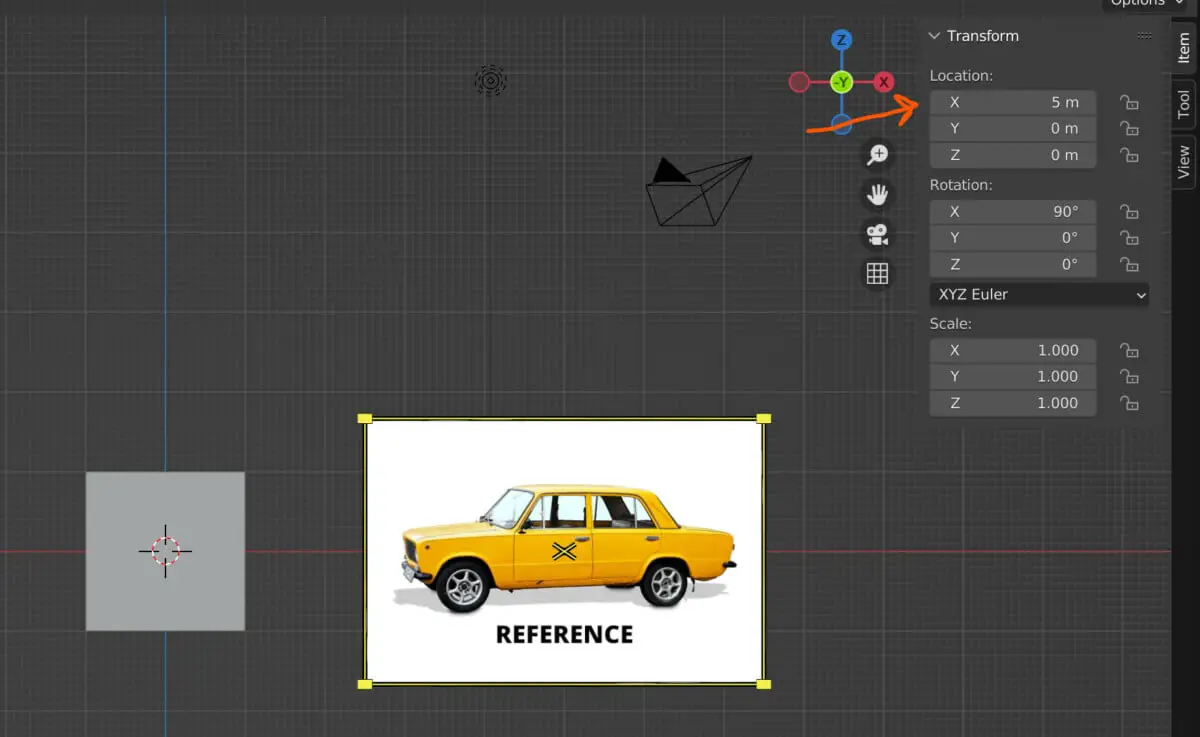
Nearly all object types that are created in the viewport are going to be positioned within 3D space. This means that these objects all have transformed: their location, rotation, and scale based on the 3D world using the XYZ coordinate system.
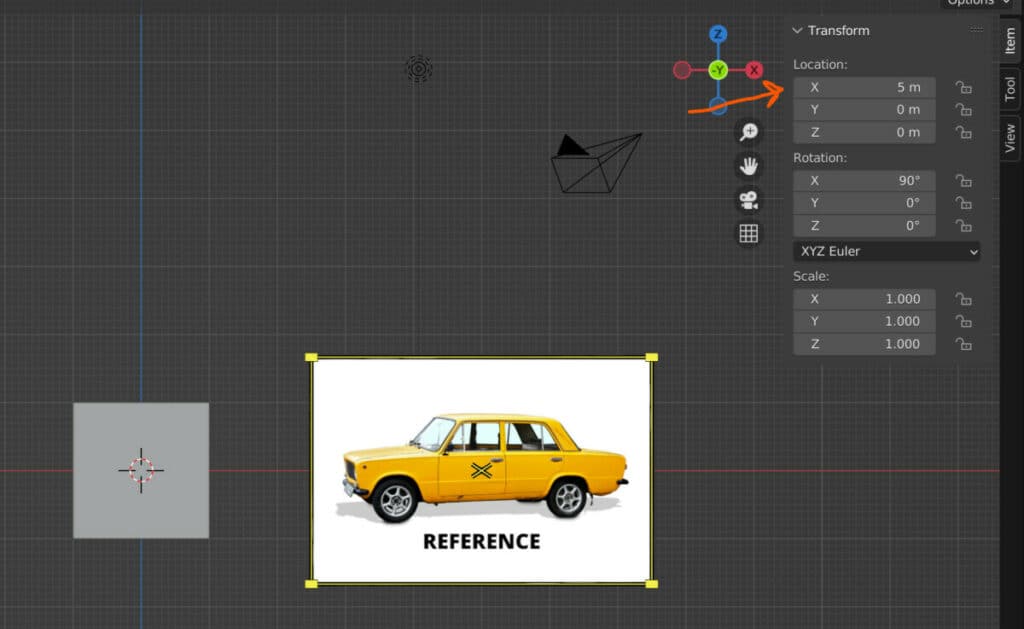
When you’ve added a reference image, you can select it by left-clicking, which is the same as any other object.
You can then use the various hotkeys such as G, R, and S to grab, rotate or scale your model. You can also use the Gizmo tools that are found on the tool shelf or manipulate numerical values on each axis in the viewports side panel.
Almost every tool that you can use on mesh objects in object mode can also be used with regard to image objects. This includes the ability to manipulate the object’s origin and determine the pivot point.
The Settings Of The Reference Image
Once you have added and positioned your reference image within the viewport, you can go to the properties panel and select the Object Data tab, where you can edit many of the settings exclusive to the image object type.
The tools and features that you find in this tab will change depending on the type of object that you have selected. For example, if you were to select your mesh object, you would find the ability to manipulate things such as vertex groups from this panel.
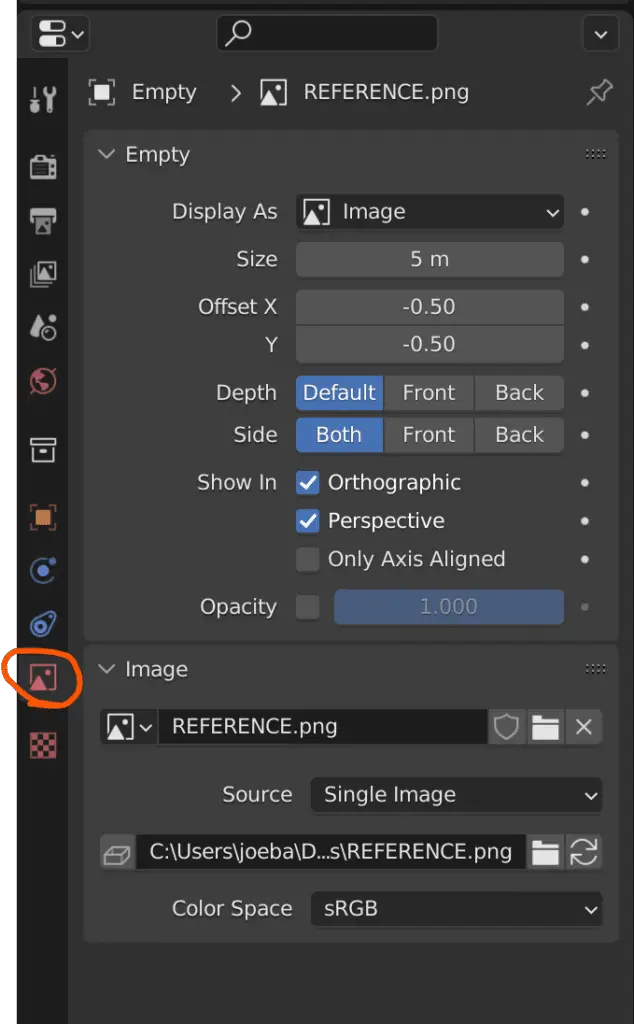
The properties are divided up into two sections, one is labeled as empty, and the other is labeled as image.
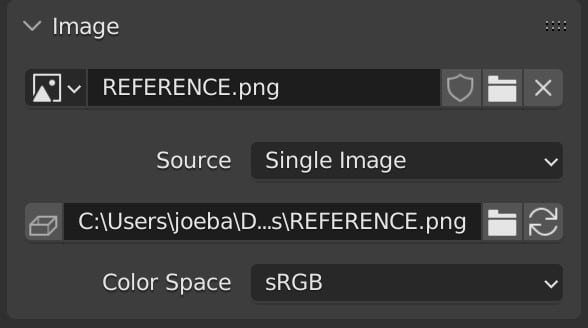
The Image Section
The image section is pretty straightforward. This is where we can change the actual image being loaded into the viewport. You can even detach the current image by pressing the X button, or you can load an entirely new image by clicking on the folder icon, which will open the file browser, allowing you to choose a new image.
There is even the added ability to define the color space data the reference material is using. This is not of great importance because. All we want is the main detail of the image, and it’s only going to be used as reference material anyway.
The Empty Section
What is more interesting is the various features you will find in the empty section. Again, blender classes the image object height as a form of empty that cannot be rendered.
The first option here is display which by default is set to image. This is a menu option, and when we click on the image button, we can change the display to another form of empty.
When we do this, all of the other options other than the size are going to disappear. So keep in mind that if you are bringing in your reference material as reference material, you’re not going to want to change the display as option at all.
We can also see in the outliner that our image object is technically classed as an empty, but it has a unique icon in the outliner panel to show that it is also an image.
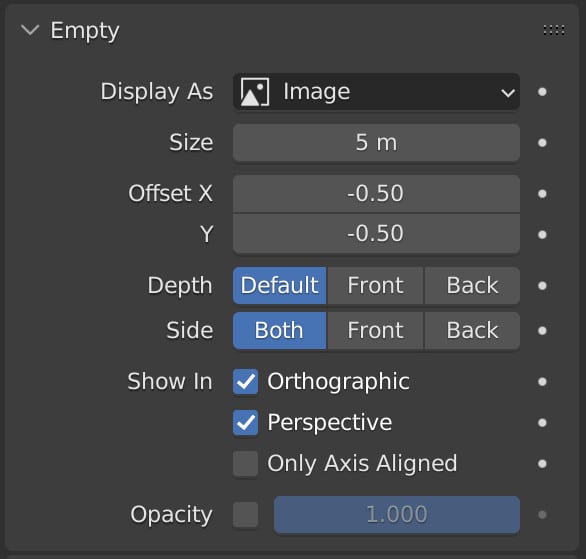
Back in the properties panel, we can manipulate various aspects of our image, the most obvious of which will be the general size, which is equivalent to manipulating the scale value. The offset values on the X&Y axes position the image based on the object’s origin. By default, they are both set to minus .5, which positions the object origin at the center of the image.
By setting both of these back to zero, the object’s origin will appear at the bottom left-hand corner of the image. This will affect how the image can be manipulated regarding its location, rotation, and scale transform.
The depth option represents how the reference images will be viewed when positioned In Front or behind our objects.
Say the reference image was positioned to cut through your primary model. The default option will actually display this, so a part of your model will be visible, but anything that is behind the reference image will not.
If we set the depth to the front option, then looking directly at the reference image will hide any mesh object that may also be focused within that line of sight.
Even if a part of the model is actually in front of our image, it will not be visible. This option is best used if you want your reference imagery to always be visible in the viewport.
Alternatively, the back option will do to reverse. So if a mesh object is both in front of and behind the reference image, and you set the depth to back, you can see the entire mesh object.
Regarding the side option, we need to remember that an image object is just effectively a plane. So it has two sides. It has the front and the back. When set to both, we can orbit around our model and our reference image while still being able to see the image from either side.
If this option is set to front, then we will only be able to field a reference image from its front, and if we orbit our few behind the image, it will pass through in an effect similar to back face culling.
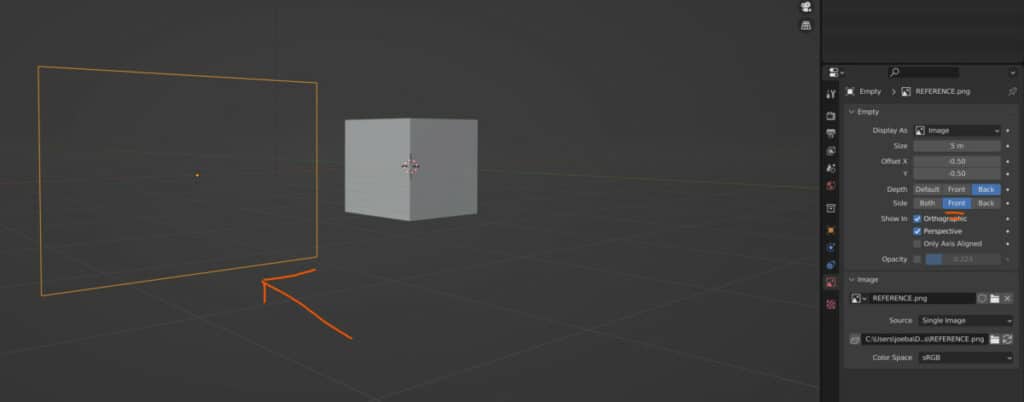
If we set these side option to back, then it will do the opposite. We cannot view our image from the front side of the face, but it will be visible from the back.
Then we have the show-in options by default. The first two of these will be ticked for orthographic and perspective views.
The difference between these two view types is that the perspective view has depth. When working in 2D views, we are often working in orthographic view type.
So if you are modeling using a 2D orthographic view but don’t want the reference image to be visible as you navigate the viewport. It can be ideal to turn off the perspective option but keep the orthographic option switched on.
The only axis-aligned option takes this to another level, And he’s only best used when you are adding an image that faces a specific axis.
For example, let’s say you add your reference material facing the front orthographic view. By ticking this box, Blender will only show your reference image while in that exact viewpoint.
This functionality works if you add an image at an angle based on your viewports camera. However, it is highly unrecommended Because as soon as you move out of that view, it becomes extremely difficult to get back to that exact viewpoint.
This is why it is best suited for a 2D view which you can move to just by pressing one of the number pad keys.
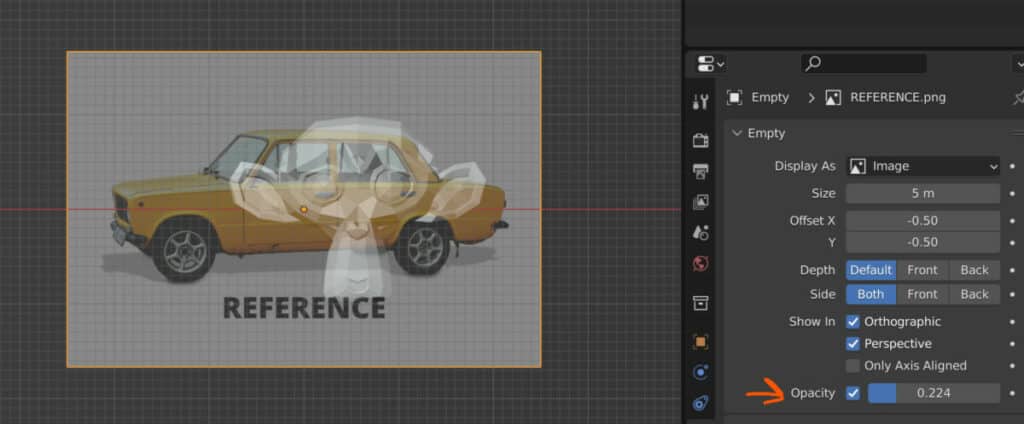
The last option is to change the opacity. When activated, the opacity will have a set value of 1, which means that the image is clearly visible, and you can’t see through it.
The lower the value goes, the more transparent the image becomes. This can be useful if you want to see what is behind your reference material, but you still want to see the reference material itself.
Thanks For Reading The Article
We appreciate you taking the time to read through the article, and we hope you found the information you were looking for. If you are interested in learning more about using images in Blender 3D, take a look at some of the articles we have listed below.
- Why Does My Rendered Image Look Pixelated
- How Much Does It Cost To Send Your Images To A Render Farm
- How To Import Reference Images Into Blender
- How To Insert An Image Into My Scene
- How To Apply An Image Texture To My Object
BEGIN LEARNING AND DEVELOPING WITH OUR BLENDER VIDEO SCHOOL!!
Check out our course library if you are looking for a systematic and effective way to improve your skills as a 3D artist. Click Here To Learn Blender The Right Way!
