Blender is customizable in a variety of ways and is built from the ground up for being a jack of all trades kind of software. You can also manipulate the interface for whatever tasks that you need to complete by changing things like workspaces layouts, panel sizes, and editors. In fact, you can even change the color scheme of the Blender interface.
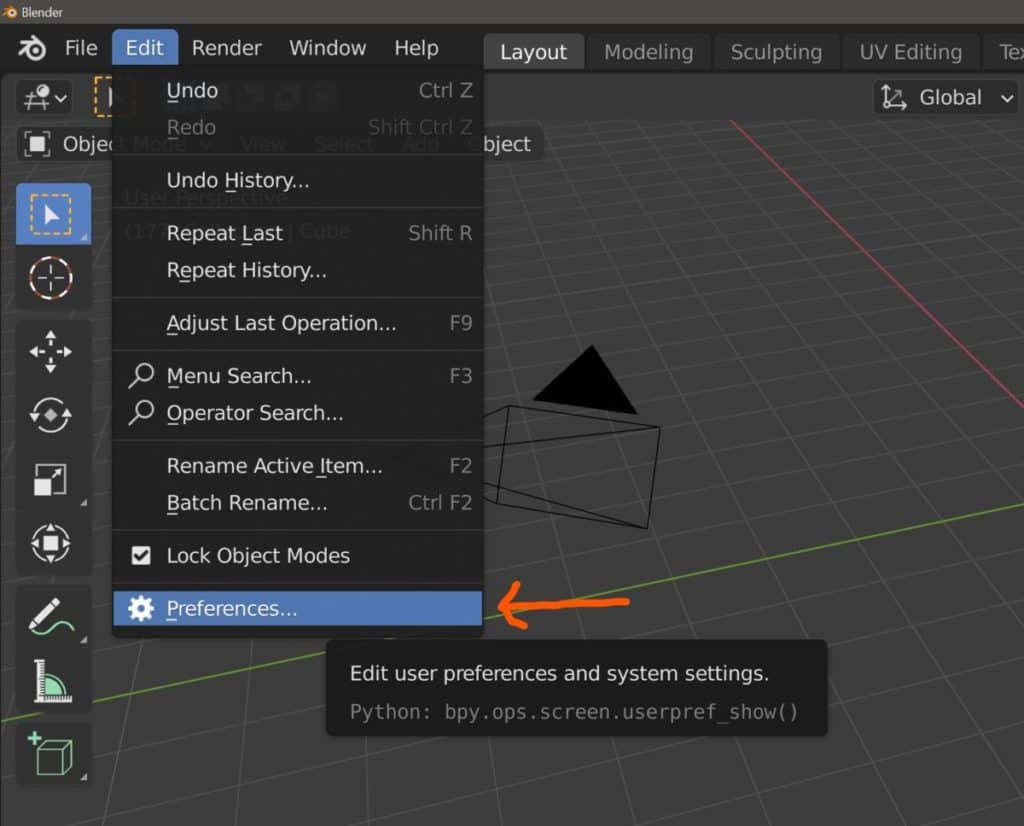
To change the colors of the Blender interface go to Edit > Preferences > Themes, where you will be able to adjust the color of every single element that you can find in Blender. You can design and create your own presets by changing the colors of certain elements and then clicking the plus button in the top corner, in addition to selecting from a pool of existing color themes.
Learning to change the colors of the blender interface is not going to make you better at using Blender, but it’s a useful toolset for those who use Blender on a regular basis who want to deviate away from the base appearance and create a color scheme more unique to them.
Where To Access All The Settings For Changing Blenders Color Scheme?
The settings for Blenders color scheme can be located in the preferences panel, which can be accessed either by changing the active editor in any of your existing panels or by going Edit > Preferences, which will open up the preferences panel as a separate window.

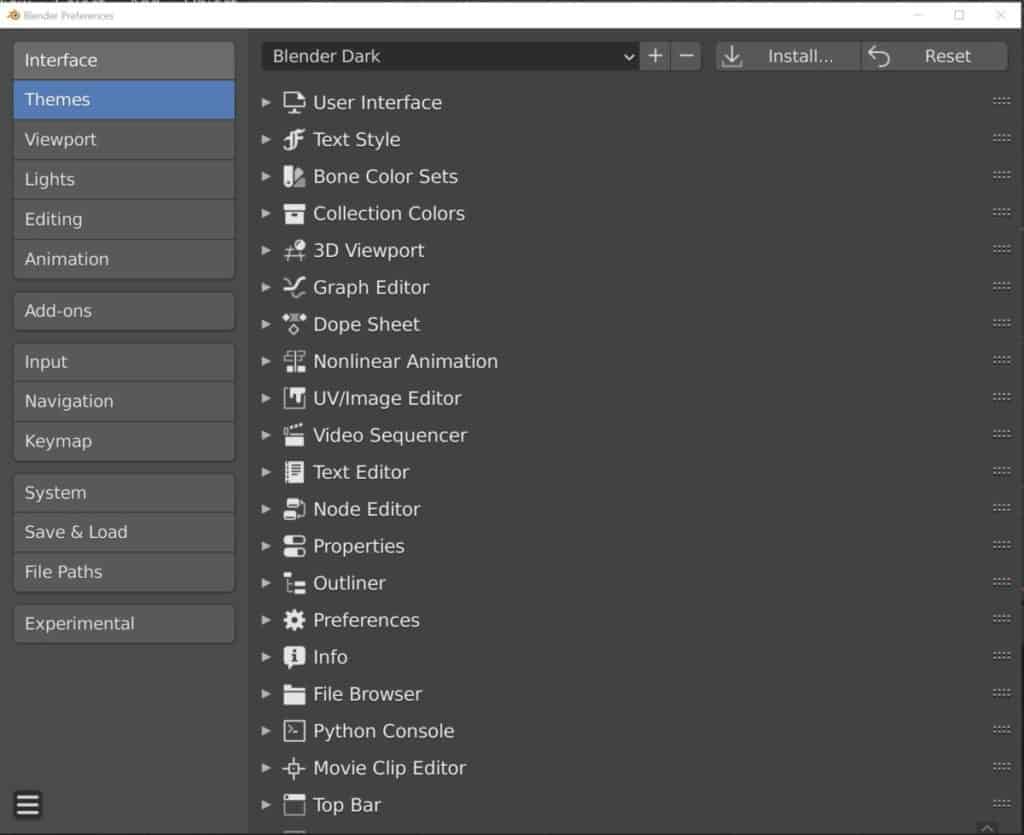
In the preferences panel, there will be a row of tabs on the left-hand side, one of which is dedicated exclusively to changing Blenders’ color theme. As you will have guessed it is the one labeled as Themes, so click to access it.
You will notice that there are a lot of layers to the theme system. You can access all of the different editors independently or make changes to the more universal elements in Blender.
Even going inside a sub-category like the Graph Editor will open up far more options than what you will know what to do with.
We advise that you spend as much time as you want to test the different elements that you can change, and every element Blender is changeable, from the axis colors in the viewport to the color of the keyframes in the dope sheet, but some elements will not be immediately recognizable and so you can change the color to see what it effects.

Keep in mind though that if that item or element is not displayed on your screen then you will not be able to change it.
When you are done experimenting, you can easily reset your color scheme by pressing the reset button found in the top corner of the preferences panel, so you don’t have to worry about inadvertently making permanent changes.

Changing To One Of The Existing Preset Themes In Blender?
You don’t have to start hunting down all of the different elements to change your theme, instead, you can just choose a theme that already exists pre-built for Blender.
At the top of your panel, you will see a drop-down menu labeled as presets, which you can click on to view and select all the ready-made themes in Blender.

The current theme is the Blender Dark theme, which will likely be at the top of the list. You will be able to select each of the different themes in the list and Blender itself will load the selected theme in real-time.
My personal favorites from the list are Modo and Deep Grey which have a very easy to look at the color scheme. While this is a personal opinion, I don’t believe Blender looks as good when using a brighter theme like Blender light or White. Your opinion may differ though.
Which Elements Should I Change In The Blender Interface?
That entirely depends on what aspects of Blender you use the most, and it’s all about your personal preference as well. So we can’t tell you exactly what elements you should change. We can however tell you where to find the most common elements in Blender that can make fast changes to the appearance of Blender on your desktop.
Below we will list which elements we recommend finding so that you can change them at your leisure.
Editor Header
Every editor type has its own header menu, and this is just one of the many elements that you are able to change in Blender. You could for example change the header of each editor type so that it becomes easier to distinguish from the others.
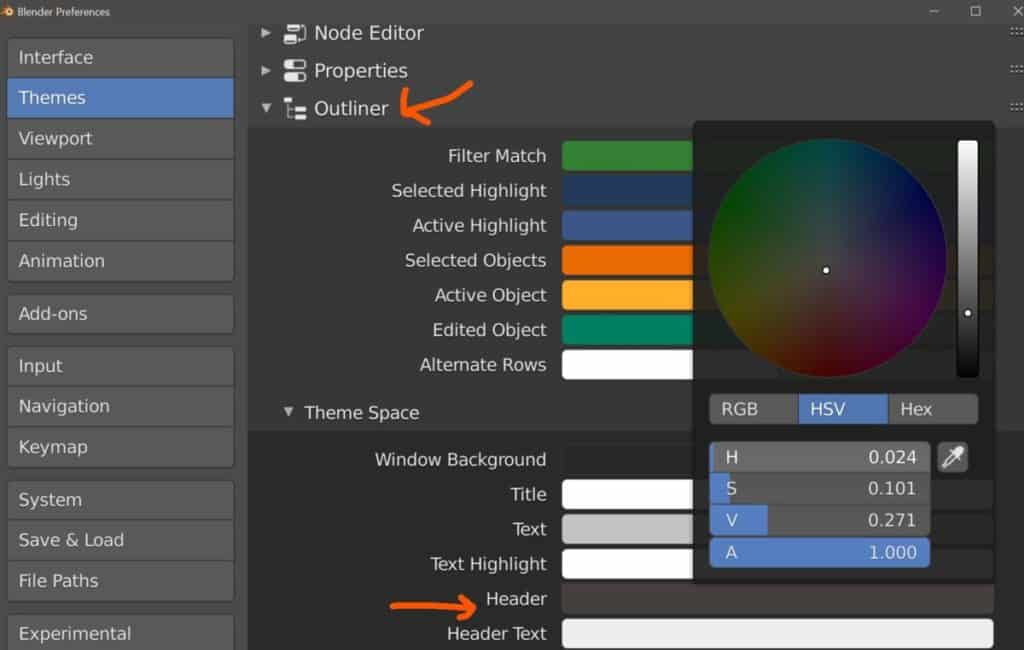
To change the header menu of a specific editor type, first locate the editor type from the list in the themes tab, for example, the Outliner, and open it up.

You will not see the option for the head here, as it is located under a subtab called Theme Space. All of the different panels will have this Theme Space subtab as it contains the same elements for each.
About halfway down the list, you will see the option to change the color of the header. Clicking on the grey bar will open up the color wheel, which can be used to change the color of the header in real-time. This color wheel will appear every time you click on the color of an element.
Window Background
Located in the same area as the editor header, you can change the window background for almost any editor type in Blender.
If we stick to the outliner, you will again find this option under the Theme Space subtab, and it will be one of the first options that you see.
A lot of information is obviously stored in your editors, so try to avoid changing the color to something that makes it hard to read.
Grid Of The Viewport
You will be working in the viewport more than almost any other editor type, and you can change many of the elements under the 3D viewport tab in the Themes menu. One of the more obvious changes that you can make to alter the appearance of your interface is the color of the Blender grid.
This option will be the 1st one available to you in the 3D viewport tab and makes the fastest change to the viewport look.
Active Objects
Another common element is the highlight of selected objects. By default, this is a yellow/orange color used to distinguish the active selection from other objects in the scene.
This is another setting that can be located under the 3D viewport tab. You will also notice that we have a color for active objects and a color for selected objects, which is darker orange by default, right above it.
The active object is the last object that you selected in your scene while the darker orange indicates which other objects are a part of the selection.
As the two colors are fairly similar to many people these are common elements for changing so that you can better identify which is which.
The Three Axis
We do not recommend changing this if you are a beginner as many tutorials identify the three-axis as much by their colors as they do by their names. But the option is still there if you want to do so.
The option to change these colors is not found under the 3D Viewport tab, but rather the user Interface Tab instead.
To locate, open up the user interface tab and scroll down until you see the menu for Axis & Gizmo Colors. Then open it up you will see the option to change the colors for the X, Y, and Z-axis.
Top Bar And Status Bar
These are not specific elements but rather the fixed areas on the top and the bottom of the Blender interface. They each only allow for changes to be made under the theme space settings.
You can therefore change elements like the header and the header text for the status bar. For the header menu though initially does not allow for much change other than the header color, as most of the elements are found under the User Interface tab instead.
Changing The Buttons And Menus
There are a lot of buttons and menus in the Blender interface even with the default layout, and this is one of the more challenging things to find when trying to change the color theme as many of these buttons fall into different categories.
Most of these categories will be located under the User Interface tab so then it becomes a matter of testing each of the options to see which element affects what in your UI, here are a few of the more common types of buttons/menus…
Regular Buttons use a boolean function, meaning they act as checkboxes that enable and disable certain tools, such as proportional editing or snapping found in the 3D viewport.
Tools are used to add, delete or reorder other elements in Blender. The X button next to a modifier is an example of a tool that can be used to delete that modifier.
Toolbar Items are found as the bi row of buttons to the side of the 3D viewport. As with many other elements, you can change the Inner color of the button for when it is both active and inactive.
Radio buttons allow you to switch to another mode or tab in your selected editor. The tabs in the preference panel that allow you to access themes, addons, etc are examples of radio buttons. Other examples include the viewport shading modes.
Number Fields are any boxes that possess changeable numerical values. An example of this would be in the side panel where you can change the location, rotation, and scale values on each axis.
Pull Downs are menu buttons that are labeled with text and store a variety of independent tools, such as the View and Add menus that you will find in the 3D viewport.
Menus are similar to dropdowns but can have an icon represent the contents rather than text. The options in these menus are typically just different ways of performing the same tool. For example, changing the falloff type for proportional editing.
Creating A New Theme Preset
Once you have made all of the changes that you want to make to your theme, you can then save it as its own preset. this will allow you to use t across all of your future projects and even your older ones as well.
To the side of the presets menu, you will find the + and – buttons. The minus button will delete the active preset from the list, so avoid doing that to any of the existing themes. The plus button will allow you to name your new preset, so give it a new name and then click on the Ok button.

You will now find your new theme included among the list of presets.
Thanks For Reading Through Our Article
We hope that you enjoyed reading our article. Below we have a list of other topics that we think you may be interested in.
- How To Navigate In 3D Space?
- What Are The Differences Between Eevee And Cycles?
- Should I Use Eevee Or Cycles For Rendering?
- How To Download The Latest Version Of Blender?
- What Is The Best Marketplace To Sell Assets On?
-
Color Grading in Blender: Post-Process
Color grading techniques for cinematic post-processing in Blender.
-
HDR Lighting: Blender Environment Tips
Achieving natural lighting effects with HDR environments in Blender.
-
Blender’s Ambient Occlusion: Depth Tricks
Enhancing depth and realism with ambient occlusion in Blender.
BEGIN LEARNING AND DEVELOPING WITH OUR BLENDER VIDEO SCHOOL!!
Check out our course library if you are looking for a systematic and effective way to improve your skills as a 3D artist. Click Here To Learn Blender The Right Way!

