Navigating the complex landscape of 3D design requires not only creativity and precision but also the ability to work efficiently. This is especially true when using comprehensive tools like Blender, where every second spent maneuvering through its vast array of features can make the difference between a good design and a great one.
For both seasoned professionals and enthusiastic beginners, knowing the ins and outs of Blender’s interface is just half the battle; mastering its myriad of shortcut keys is where true efficiency lies. As most of Blenders features can often be hidden away in menus, direct access is critical to making the most of these tools without losing time.
What Are Keyboard Shortcuts In Blender 3D?
Blender 3D is an astounding piece of software, celebrated for its capacity to sculpt, animate, and render three-dimensional graphics. Yet, its true potential shines through when users acquaint themselves with the vast array of keyboard shortcuts.
Like a pianist dancing their fingers across the keys, an adept Blender user can create masterpieces by simply mastering a few keystrokes. But, what exactly are keyboard shortcuts in Blender 3D, and why are they so crucial?
Keyboard shortcuts in Blender 3D are more than just convenience tools; they’re an extension of the artist’s palette. From basic navigation to intricate design operations, these shortcuts are the bridge between imagination and realization. By investing time in mastering them, you not only optimize your workflow but also elevate your design capabilities, paving the way for groundbreaking creations.
An Example Of Using A Shortcut Key In Blender
There are more examples for shortcut keys in Blender than you could probably ever learn, but to give you an idea as to how a shortcut cut works, imagine that you have an object in your viewport and you want to scale the size.
You can do this by going over to the tool shelf in the viewport and then selecting the scale tool. You return to the object and click and drag on the scale gizmo to adjust the size. A quicker way would be to use the shortcut for the scale tool, which is S on your keyboard. Select the object and then press the S key to begin scaling the object in your viewport. It’s as simple as that.
Another example is saving your work. The traditional way to save is to go to the file menu in the top corner, locate the save option and select it. The hotkey for saving is Control + S. Hold down the control key and then press S to save your work.
Hotkeys can save you a couple of seconds each time you use a tool, but since you will use tools 100’s of times throughout a project the time saved builds up.
Where To Find The Shortcuts For Each Tool?
Not all tools have a hotkey associated with them, but the majority of them will. The more popular the tools the more likely it is to have a hotkey associated with it. But where can we find these hotkey listings?
Hotkeys For The Tool Shelf
Depending on the mode that you are currently using, you will have a series of tools available in the tool shelf of the 3D viewport.
For example, in object mode, these tools will include selection, location, rotation, and scale tools plus a couple of others.
Normally, you would select one of the tools from the tool shelf using LMB to make that tool active, and then manipulate the gizmo associated with that tool to use it.
With a hotkey, you can begin using it as soon as you press the key, which is slightly faster in most cases.
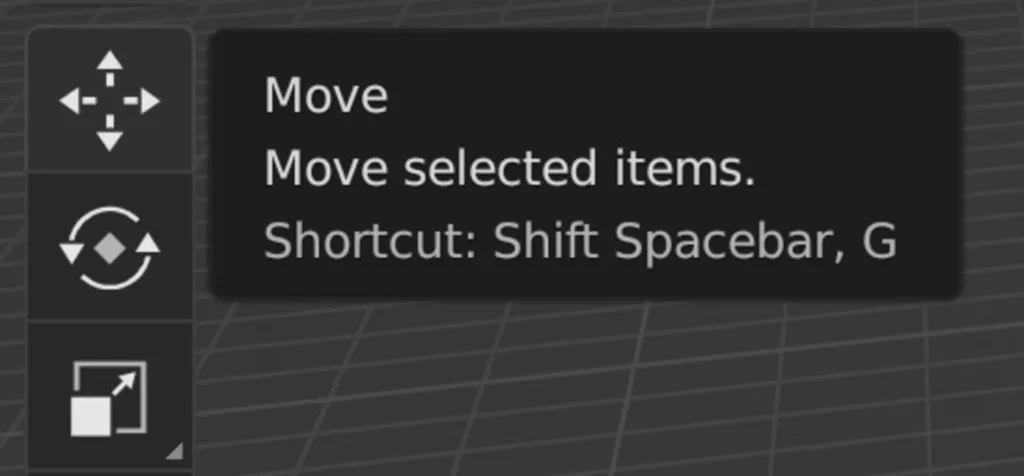
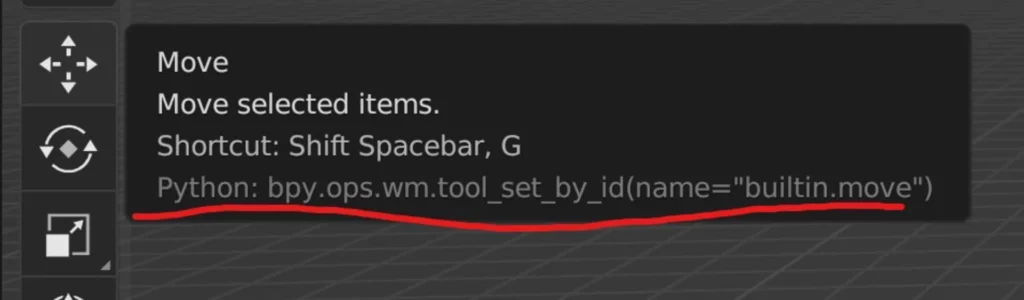
By hovering over the tool button on the tool shelf, a tooltip will appear that details the name and purpose of the tool.
In addition to this, the tool tip will always finish with a line for the shortcut: of the tool. In the instance of the move tool, used for changing the location of the selected object, the last line will read:
Shortcut: Shift Spacebar, G
This means that there are two shortcuts that are either directly or indirectly connected to the Move tool. Using Shift Spacebar opens up an additional menu in the viewport that will normally have the same options as in the tool shelf.
This works in the same way as just selecting the tools within the toolshelf itself, but if you learn the hotkey it works out slightly faster than moving your cursor into position and then left-clicking. The second option is the G key, which is the universal GRAB tool in Blender that allows you to grab and move objects. Just press G to start moving selected objects, as simple as that.
Hotkeys For Tools In The Menu
Beyond the tools found in the toolshelf, we also have many more tools available in the various menus of Blender.
For example, in edit mode, we have menus for the MESH, VERTEX, EDGE, and FACE to name a few.
If we open up the face menu, we get a list of all the tools that we can use to edit the faces of our mesh objects.
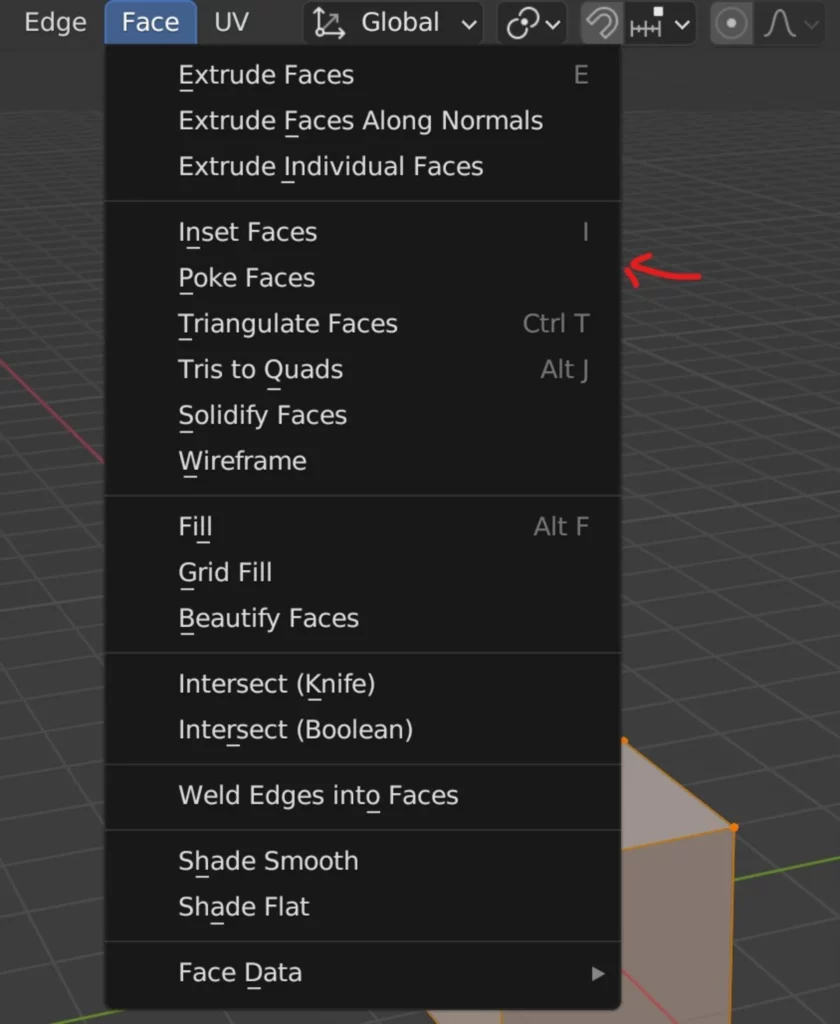
Some of these tools will, in addition to the tool name, also have additional in a greyed-out font. These are the hotkeys for the tools on the same line.
With the inset tool, we have the I label at the end, and with the Tris to Quads tool, we have ALT + J as the hotkey.
You will notice that many of the tools here do not have additional text at the end, which means that they do not have hotkeys assigned to them.
How To Access The Shortcut Library?
In addition to making shortcuts easy to locate for many of the common tools in Blender, you also have access to an entire library where all of the hotkey information is stored and controlled.
To access What is known as the hotkey keymap library. First, go to the edit menu, then at the bottom select preferences.
This will open up the preferences panel as a separate window to the side of this panel. We have all of the different subsections. One of these is labeled as Keymap, left click to select it.
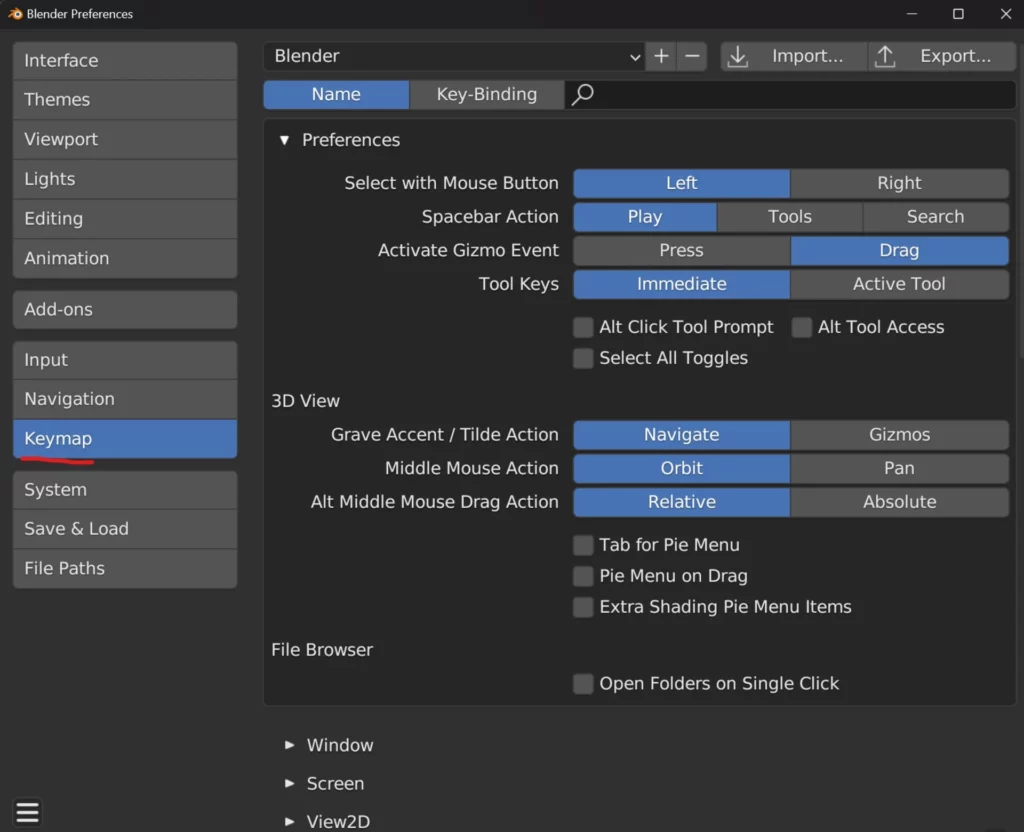
This will now open up the keymap library for Blender 3D in its entirety. From here you can access every single hotkey assigned to their appropriate tools.
Creating Your Own Keyboard Shortcut
In addition to being able to locate your hotkeys within the keymap library, you can also create your own keymap hotkeys.
This can be done in one of two ways, either via the hotkey library itself or by assigning the hotkey to a specific tool in the Blender UI.
The second of the two solutions is much easier as it can be done when accessing the tool itself as you normally would.
Assigning A Shortcut In The Menu
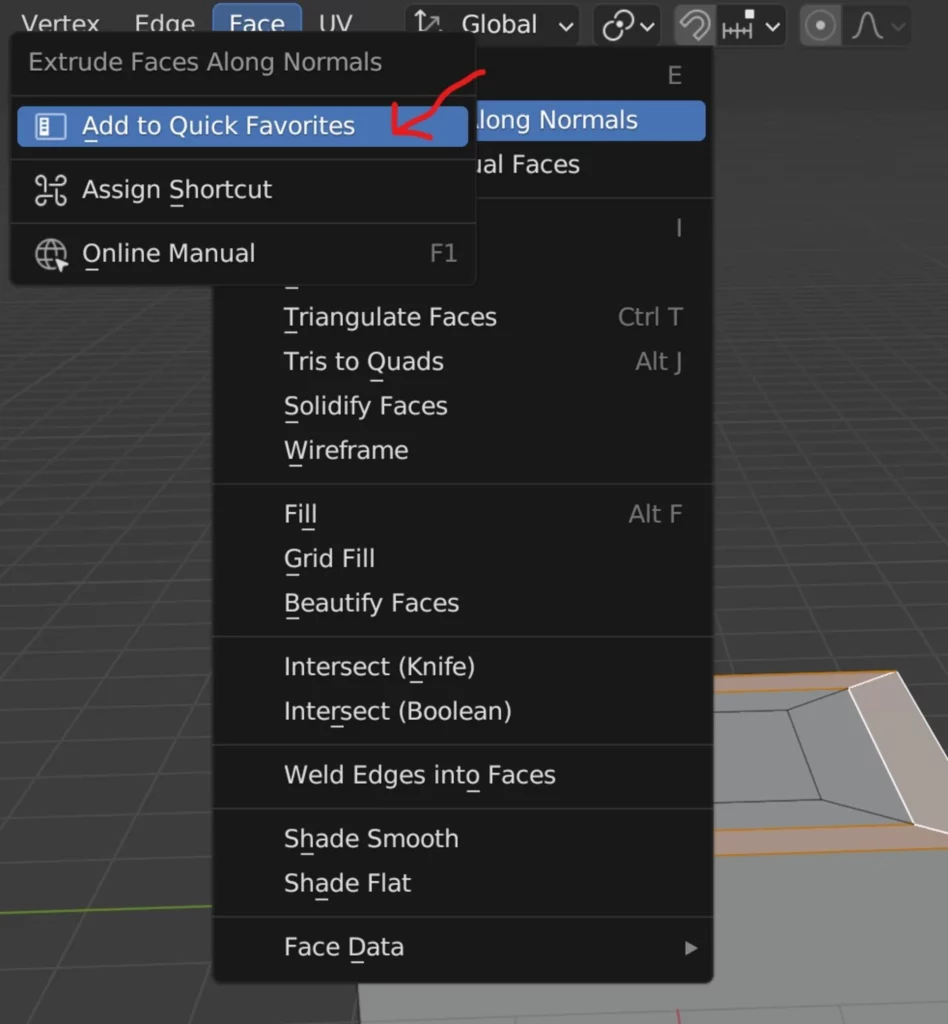
Let’s return to the face menu and pick a tool that does not have a shortcut key assigned to it, like the extrude along normals tool.
To add a shortcut to the tool, hover over the tool name and use RMB (Right Mouse Button) to access the context menu.
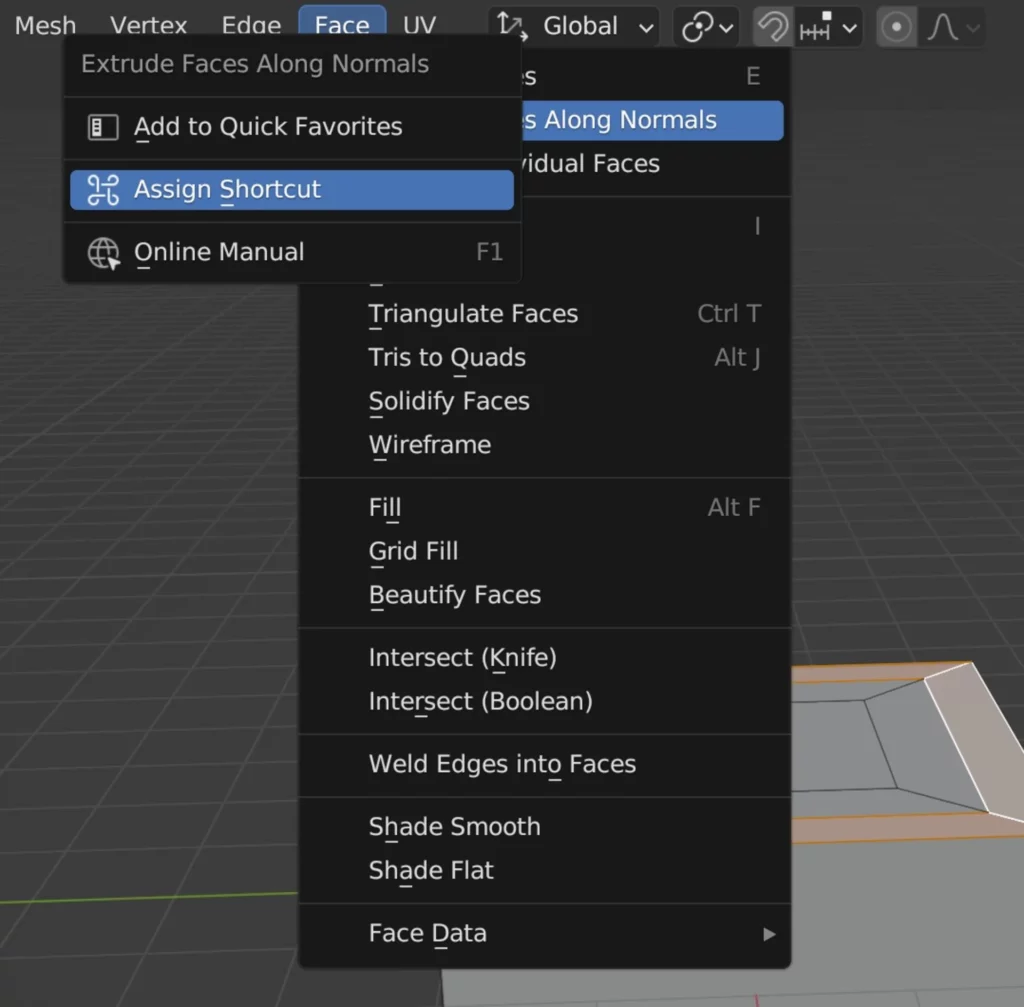
From this menu select the option labeled ‘assign shortcut’ and a prompt will show asking you to assign a key. Be warned that as soon as you press anything on your keyboard it will be assigned as the new hotkey.
For now, we will use the number 4, which is not assigned to anything when in edit mode. Now return to the face menu and you will see that 4 is the new shortcut for the extrude along normals tool.
A couple of things to note. you can change the shortcut key of a tool that already has one assigned to it, but we recommend not to unless you are coming over from another application that uses different keys for its shortcuts.
Also, you can remove shortcuts by accessing the same context menu. The option will only appear if a shortcut is currently assigned though.
If you want to add shortcuts for some of the tools we have a small table of keys directly below that you can use. These keys are either free to use, or may be used by other tools that are not as frequently required.
Note that this table is for edit mode in the viewport, which is one of the most commonly accessed areas of Blender. In other areas of Blender these keys will probably be in use.
| 4 | SHIFT/CONTROL/ALT |
| 5 | SHIFT/CONTROL/ALT |
| 6 | SHIFT/CONTROL/ALT |
| 7 | SHIFT/CONTROL/ALT |
| 8 | SHIFT/CONTROL/ALT |
| 9 | SHIFT/CONTROL/ALT |
| 0 | SHIFT/CONTROL/ALT |
| – | SHIFT/CONTROL/ALT |
| = | SHIFT/CONTROL/ALT |
| [ | SHIFT/CONTROL/ALT |
| ] | SHIFT/CONTROL/ALT |
| D | SHIFT/CONTROL/ALT |
| ; | SHIFT/CONTROL/ALT |
| # | SHIFT/CONTROL/ALT |
| \ | SHIFT/CONTROL/ALT |
As an additional note, you can also assign shortcuts to additional macro keys that you may have, such as with an Elgato stream deck.
Assigning A Shortcut In The Keymap Library
The alternative option is to create your shortcut in the keymap library. While this does offer more visual control over what you are doing, it is a more complex method. In most cases, simply add you shortcut to the tool directly in the Blender UI.
If you do want to use this method however, start by accessing the preferences panel. Before we go to the keymap subsection though, go to the interface section first and tick on the box labeled ‘python tooltips’.
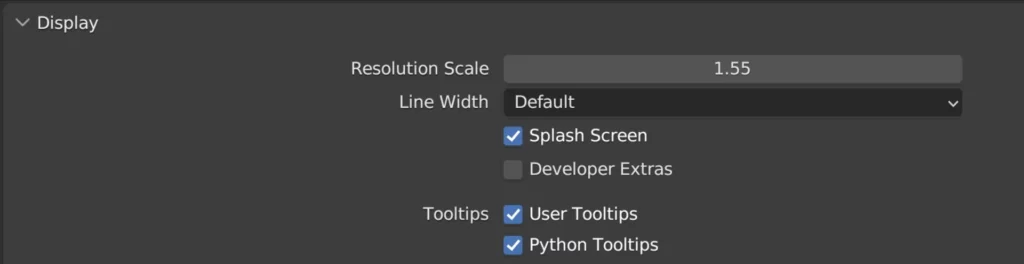
When you hover other a tool in Blender you will see a tooltip that displays information about that tool. By clicking this option that tooltip will display the python code used to call that tool as a function. This is important for the next steps.
Go to the keymap library in the preferences panel, which is divided up into the various sections in Blender and even the modes accessible in each section or editor. For our example we will add a hotkey to the Extrude Along Normals tool.
We need to locate the correct area of Blender to add the hotkey as it wont work if we create the keymap in the wrong section.
For our example, go to 3D View > Mesh > Mesh(Global) and then scroll down until you see the new option. Click on new to add a new shortcut to the section.

If you click on the arrow to the side it acts as a drop down and displays all the information associated with that key, which at the moment is nothing at all.
In the black input box is where we will write the code for the tool. There are two methods for this, with the first being to find the tool within the keymap library itself.
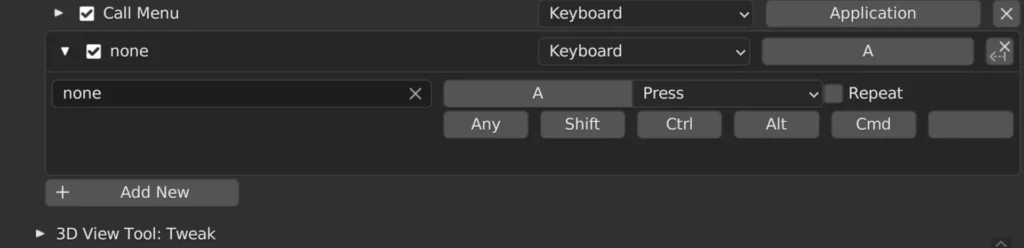
Scroll down in the mesh section until you come across the following option:
3D View Tool: Edit Mesh, Extrude Along Normals
Open this option and then select the code block with A. Use the command Control + C to copy the block of code and return to where you created your new hotkey. Paste the code into the text block and all the data for the extrude along normals tool should appear.
Assign a key to your shortcut and then return to the viewport to test. When changes are made in the preferences panel expect them to save automatically. If it does not work, you can try the second option.
The second option requires you to type in the code displayed in the top tip of the selected tool. An example of this can be seen below.

Accessing Your Favorites Using The Shortcut Menu
Another way of making quicker access possible for certain tools is to add them to your quick favorites. Quick favorites menu by default is an empty menu that can be accessed by pressing the Q key on your keyboard.
If you want to add a tool to your quick favorites, then locate the tool in its appropriate menu. When you find the tool that you want to add, right-click on that tool name to bring up the context menu. within the context menu is the option to add this tool to the quick favourites. Left-click on that option.
Come away from the menu and then press the queue key again. You will find that that tool has now been added to the quick favorites menu. You can add as many tools as you want to your quick favorites.
However, it’s recommended to restrict this to 5 or 6 tools as the whole point of the quick favor for its menu is for quick and easy access for the tools that you like to use most, but don’t have hotkeys assigned to them.
If the quick favorites menu becomes too large, then you’d have to begin searching for your tools within that menu, which is no different from doing the same thing in the menus that they already exist in.
What Are Primary And Secondary Functions?
Many of the tools we use in Blender have primary and secondary functions and hotkeys can be attributed to both the primary function of the tool and its many secondary functions as well.
Specific hotkeys can change their functionality if being used as a secondary function for another tool. For example, the X key, which, when used by itself, will delete selected objects. In this case, the X key is used for the primary function, which is to delete an object
However, it can also be used as a secondary function for another tool. For example, if we hit the G key to activate the move tool, then the G key is used for the primary function, which is to move the object.
By default we can move our objects around in all three dimensions, X, Y, and Z. While the tool is active, we have the ability to lock our move function on any of these free axes by pressing X, Y or Z.
If we press the X key while using the move tool instead of deleting our objects, we simply lock its location transform to the X axis and now we are able to move that object along the X axis only.
In this case, the X key is used as the secondary function. When a tool has already been activated, certain hotkeys change their behavior when used. This is how secondary functions work in Blender.
Whenever a tool is being used in the 3D viewport, you can take a look at the footer of the blender UI. This will give you a row of different secondary keys that you can press to change the primary function.
For example, when you press the G key, you can view all of the different secondary functions assigned to the move tool, such as controlling what axis We are moving on and controlling which plane we want to move on by combining shift with X, Y or Z, or even constraining using the middle mouse button
Using The Same Shortcut In Different Areas Of Blender
There are so many different tools in a blender that it is impossible to assign a hotkey to each and every tool, and it’s also impossible to assign a unique hotkey to each and every tool in Blender. When I say unique, I am referring to using a single key that will have the same function everywhere you go within the blender UI.
There are a few hotkeys that fall into this category. For example, if we use Control + S we will save our work. This hotkey uses the same function no matter where we are in Blender.
However, many hotkeys will change their functionality depending on where the cursor is placed. In other words, what editor we are currently working in will define the functionality of the hotkey.
A good example here is the use of the M key. When working in edit mode of the 3D viewports, the M Key brings up the merge menu Which allows you how you want to merge the selected geometry together into a single point and where.
However, if we move over to our timeline, the M key will add a marker at the keyframe that we are currently on. This is a very different function for the exact same shortcut.
This is also why, when you look at the keymap library in the preferences panel, all of the shortcuts are divided based primarily on where they are located in Blender in terms of the editors. Two editors can theoretically use all of these same hotkeys, but those hotkeys can apply to different functions.
What Are The Alternative Shortcut Keys?
Because there are so many keys to learn in Blender and so many tools that require keys, the use of alternative keys is required. A secondary key is used FIRST to change the functionality of the primary key. There are three alternative keys that you need to learn for Windows, and three to learn for MAC users:
Windows
- Shift
- Control
- Alt
Mac
- Shift
- Command
- Options
Note that the control key for Windows is the same as the command key on the Mac. We typically use a Windows device when we run Blender. So if we were to refer to a Windows user’s control, then the comparison on Mac would be the command key. The same is true between the alt and options buttons. Alt on Windows is the equivalent of the options button on Mac.
An Example Of Using The Alternate Keys
Alternate keys are used with primary keys that change the functionality of those shortcuts. Let’s take the a key for example. If we were to press the A key in the 3D viewport, the functionality would allow us to select all of the objects within our viewport.
If we were to add an alternate key to this shortcut, then it would change the functionality. For example, if we were to hold down the shift key and then press a, we would open the add objects menu.
But for all alternative keys, you would hold down the alternate key first, and then while holding it down, you would then press your primary key for that shortcut to work. If you were to press a first and then shift, it would basically just perform the same function as simply pressing the A key as it is expecting you to hold down shift before you press A.
Control is another example of an alternate key. If we hold down control and then press a, we would open up the apply menu, which allows us to alley the values for the location, rotation, and scale of our selection.
The third alternate key on a Windows device is the alt key. Hold down alt and then press the A key and this will deselect all of the objects in your scene, effectively doing the opposite to what the A key does.
Below is a table that summarises the different keys used in this example and their functions.
| HOTKEY | FUNCTION |
| A | Select All Objects |
| SHIFT + A | Open Add Menu |
| CONTROL/COMMAND + A | Open Apply Transforms Menu |
| ALT/OPTIONS + A | Deselect All Objects |
As you can see, all of these hotkeys require the use of the A key as the primary. but the alternative can change the final function of that shortcut.
A List Of The Best Shortcut Keys To Learn
If you want the absolute comprehensive list of every single hotkey that you need to learn in Blender, then it would be easiest to just view the hotkey library within Blender itself. Instead, we have listed below the main shortcuts that you would need to learn for each of the main areas of Blender, starting with general hotkeys used everywhere to ones used for specific editors like the 3D viewport.
We won’t list every single one, but the keys that we believe are the most important for you to learn. We have divided it up into easy-to-view tables below.
GENERAL HOTKEYS
| PRIMARY FUNCTION | PRIMARY KEY | SECONDARY FUNCTION | SECONDARY KEY |
|---|---|---|---|
| Context Menu | RMB | ||
| Undo Action | CONTROL + Z | ||
| Search Menu | F3 | ||
| Save File | CONTROL + S | ||
| New File | CONTROL + N | ||
| Open File | CONTROL + O | ||
| Open Recent | SHIFT + CONTROL + O | ||
| Save As | SHIFT + CONTROL + S | ||
| Redo Action | SHIFT + CONTROL + Z | ||
| Quit Blender | Control + Q | ||
| Render Image | F12 | ||
| Render Animation | CONTROL + F12 | ||
| Next Workspace | CONTROL + PAGE DOWN | ||
| Previous Workspace | CONTROL + PAGE UP | ||
The general hotkeys will work regardless of where your mouse cursor is in Blender and have the same functionality.
VIEWPORT SELECTION/NAVIGATION/OBJECT MODE
| PRIMARY FUNCTION | PRIMARY KEY | SECONDARY FUNCTION | SECONDARY KEY |
|---|---|---|---|
| Select Object | LMB | ||
| Select All Objects | A | ||
| Delete Object | X, DEL | ||
| Orbit View | MMB | ||
| Zoom View | CONTROL + MMB | ||
| Pan View | SHIFT + MMB | ||
| Select Multiple Objects | SHIFT + LMB | ||
| Box Select | B | ||
| Circle Select | C | ||
| Add Object | SHIFT + A | ||
| Grab Object | G | ||
| Move Along Axis | X, Y, Z | ||
| Move Along Plane | SHIFT + X, Y, Z | ||
| Constrain | MMB | ||
| Low Movement | SHIFT | ||
| Incremental Moving | CONTROL | ||
| Rotate Object | R | ||
| Trackball Mode | R | ||
| Move Along Axis | X, Y, Z | ||
| Constrain | MMB | ||
| Low Movement | SHIFT | ||
| Incremental Rotation | CONTROL | ||
| Scale Object | S | ||
| Move Along Axis | X, Y, Z | ||
| Constrain | MMB | ||
| Move Along Plane | SHIFT + X, Y, Z | ||
| Low Movement | SHIFT | ||
| Incremental Scaling | CONTROL | ||
| Change Select Tool | W | ||
| Switch To Edit Mode | TAB | ||
| Rename Object | F2 |
While their are more hotkeys than the ones listed above we advise you to learn these ones first as you are likely to use them in almost every project that involves using the 3D viewport to some capacity.
MESH EDIT MODE
| PRIMARY FUNCTION | PRIMARY KEY | SECONDARY FUNCTION | SECONDARY KEY |
|---|---|---|---|
| Select Mode | 1, 2, 3 | ||
| Extrude | E | ||
| Lock To Axis | X, Y, Z | ||
| Bevel | CONTROL + B | ||
| Add Segments | SCROLL WHEEL | ||
| Clamp Overlap | C | ||
| Profile | P | ||
| Switch To Vertices Only | V | ||
| Inset | I | ||
| Depth | CONTROL | ||
| Borderless Edges | B | ||
| Inset Individual | I | ||
| Loop Cut | CONTROL + R | ||
| Increase/Decrease Cuts | Scroll Wheel | ||
BEGIN LEARNING AND DEVELOPING WITH OUR BLENDER VIDEO SCHOOL!!
Check out our course library if you are looking for a systematic and effective way to improve your skills as a 3D artist. Click Here To Learn Blender The Right Way!
