When you are learning about the process of 3D modeling you will also need to learn a lot of terminologies that may be unfamiliar to you if you do not already have experience in the field or in mathematics. One of the early terms to learn is mesh topology.
Mesh topology relates to the flow of the geometry that is used to construct your 3D model. For example, your mesh objects may be constructed, as a combination of four-sided loops and poles. These help you to find the flow of your geometry affecting animations, materials, lighting, et cetera.
Learning goods apology is the second step to becoming a good free D artist after learning how to use the tools themselves. To create a good topology, not only do you need to learn how to use the tool but also when and what with.
The Definition Of Mesh Topology Is…
When we talk about mesh topology, we are referring to the actual structure of our mesh objects. The geometry used to construct a mesh can be divided up into three types.
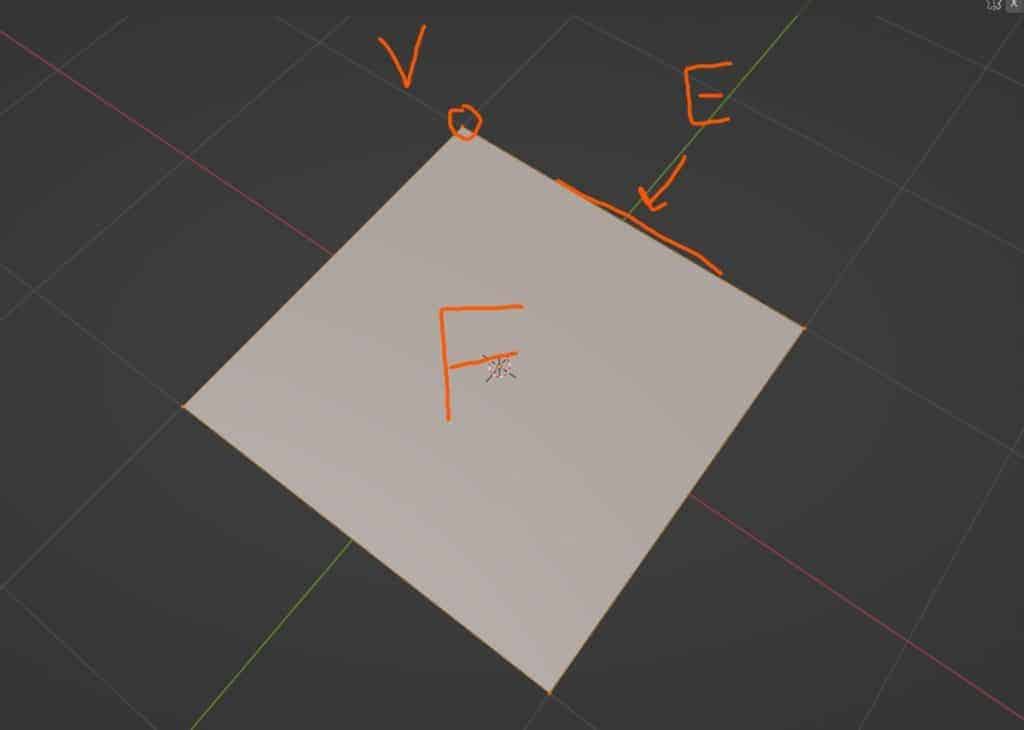
The first is the vertex, which is a singular coordinate in 3D space. The second type is the edge, which is a line that is constructed between two vertices. The third type is the face, which is a closed loop of three or more edges that can create a flat surface.
Mesh topology is the way in which all of your different types of geometry are formed. For example, a good mesh topology will have plenty of quad-based faces, which are planes that have four sides that allow you to evenly spread your geometry around your model.
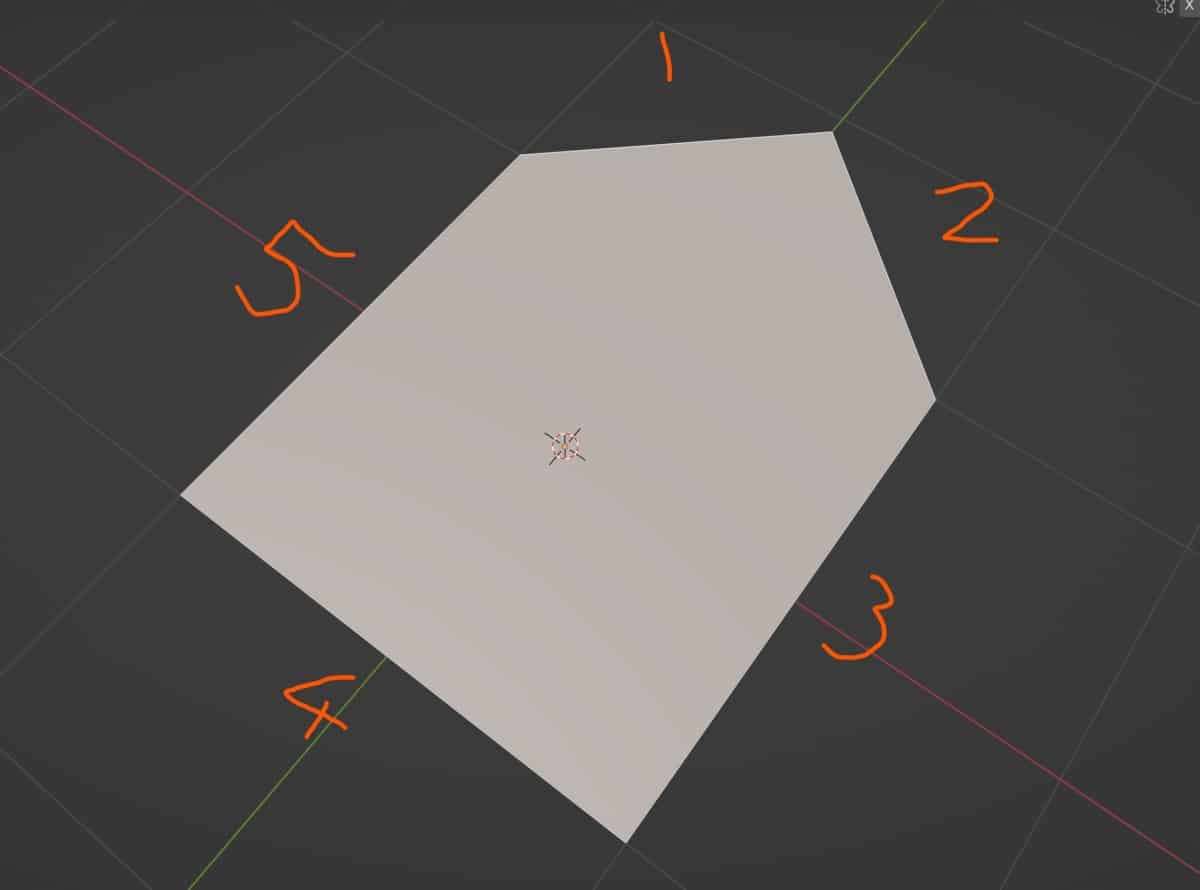
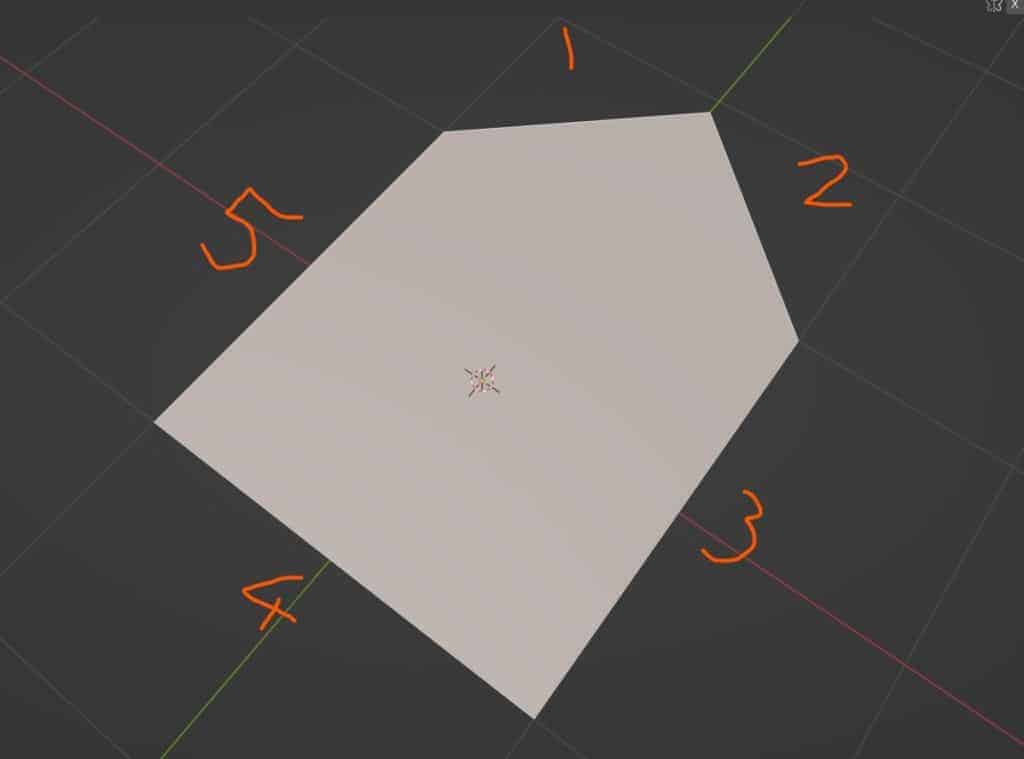
On the other hand, bad topology could be the use of Ngons where they are not required. An Ngon is a face that has five or more edges used to construct it.
What Is Edge Flow In 3D Modeling?
When we talk about edge flow in 3D modeling, we are referring to the way in which the edges will move across the model and the ability to create loops for our selections.
For example, if you hold down the Alt key on your keyboard and then left-click on an edge, you will be able to not only select the edge, but also the loop that it is connected to.
Let’s take a UV sphere as an example of edge loops. On our UV sphere, our edges ever go vertically or horizontally. If we select a horizontal edge by holding down the alt key and left-clicking, we can select a horizontal loop. This will select all of the edges going all of the way around our UV sphere.
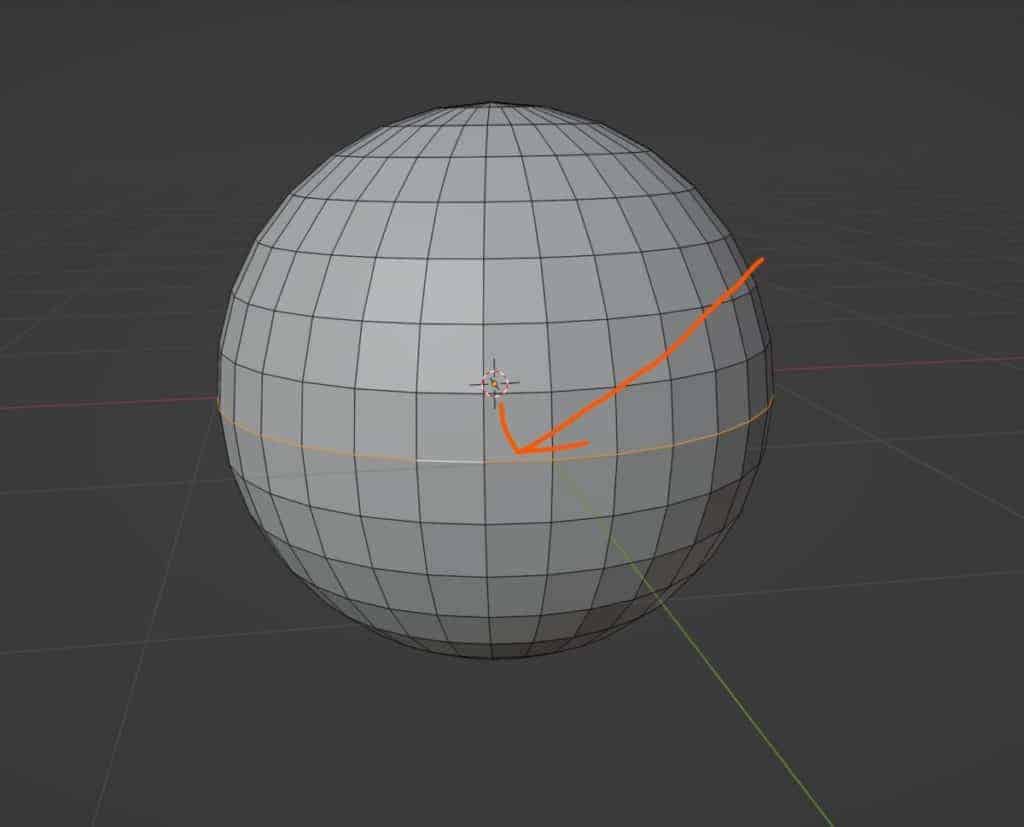
This is what we mean when we are talking about the edge flow of our model, the direction in which our loops will flow when we select an edge.
If we were to select a vertical edge, on the other hand, we would create a loop, but that loop would not go all of the way around our model. In fact, it seems to stop just before it reaches the top and bottom of the UV sphere. And this is because the UV sphere is a combination of quad base geometry and poles.
If you want to learn more about Blender you can check out our course on Skillshare by clicking the link here and get 1 month free to the entire Skillshare library.
What Are Poles And How Do They Affect Edge Flow In Topology?
The easiest way to think about mesh topology in Blender is to divide up your geometry into a series of loops and poles. We’ve already covered what a loop is. It’s where we’re able to select using the alt key a section of our geometry that follows a specific path.
A pole, on the other hand, is often used to terminate that loop. In Blender, loops are constructed from quad base geometry. Let’s take the UV sphere for example. Instead of edge select, let’s go into face select and then hold down the alt key and left-click on one of the center faces.
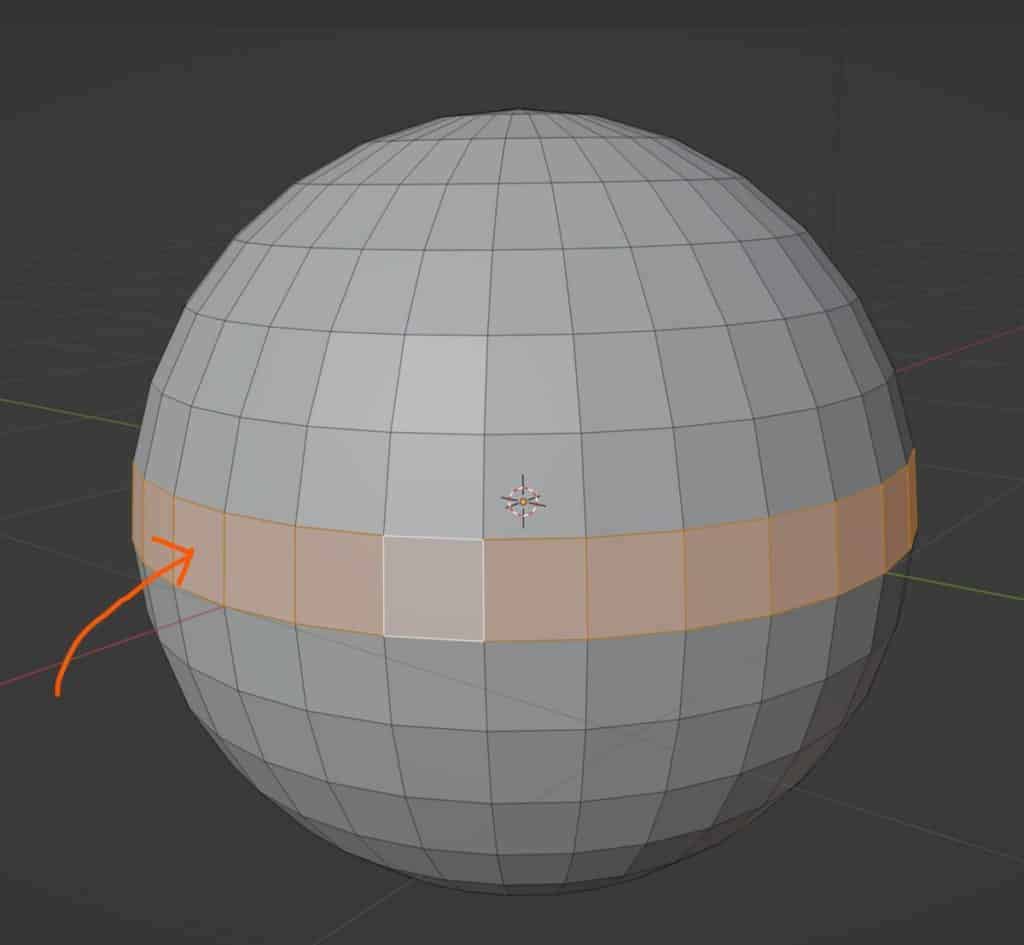
The face loop that is created goes all the way around our model and this is because the flow of our geometry is able to tell what direction we want to select the next phase.
This is easy for Blender when working with foresighted faces as the geometry can go in one of a couple of directions. In our example of the UV sphere, because we are going horizontally, Blender knows that we are going from left to right and vice versa for our selection.
So it simply has to find the edge of the face on the opposite side of the selection, to continue the face flow. If you choose to use anything other than a four-sided face, however, things become a little bit more complicated.
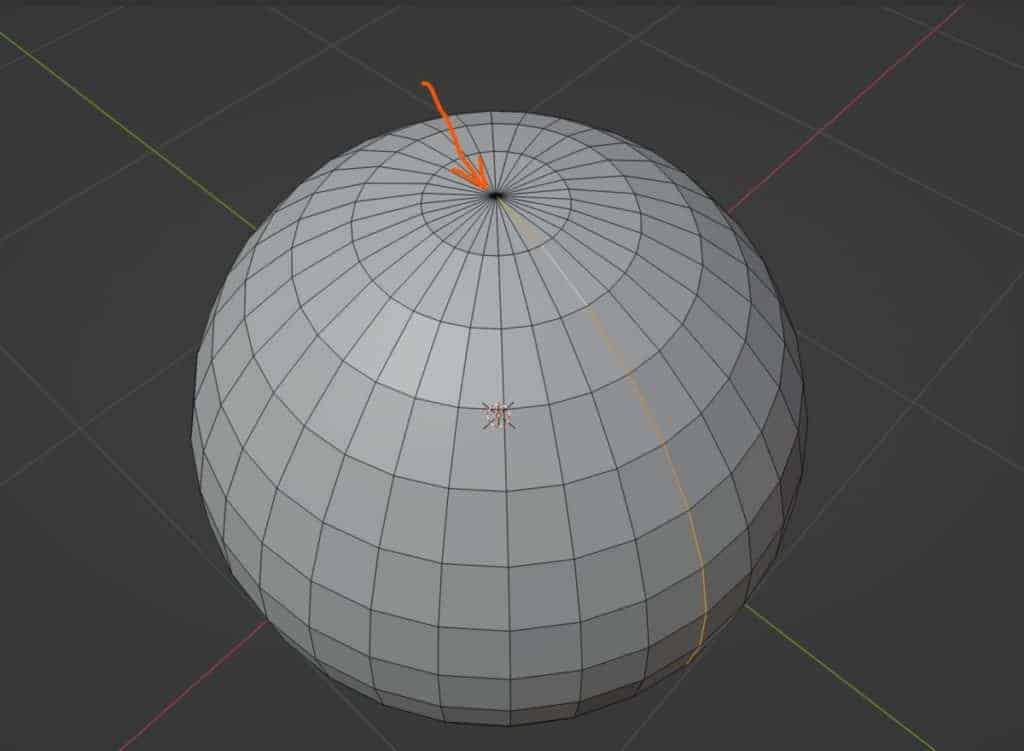
If we attempt to select a vertical loop for either our faces or edges, we find that it does not even reach the top, and that’s because if we reach the look at the top of our UV sphere, we can see that we are no longer working with a four-sided face. We are now working with three-sided faces, aka triangles.
Unlike the quad base geometry of a four-sided face, Blender does not know what direction to go in when a loop reaches a triangle.
So instead of attempting to guess what direction to go, it just terminates the loop at that location. This is what happens with our UV sphere. All of the faces are selected up to, but not including the triangles, located at the top and bottom of the UV sphere. The triangle is therefore referred to as a pole a location where a loop is terminated.
How Do You Make Good 3D Topology?
The ability to create good 3D topology in Blender depends on your understanding of how loops and poles work, as well as geometry in general.
You may think that the best way to construct a model is to avoid poles altogether, but this is not true at all, and poles are a necessary part of many 3D models, including characters.
For example, on the face of a human character, you’re going to want loops that surround the face, such as loops for the nose, and then even ones that come from the top of the forehead down to the bottom of the mouth.
By understanding how loops work, you can actually better control the animations that you want to create. By positioning Poles in the right areas, you can control how your animation affects other parts of the face or other parts of your geometry.
You can also create poles on your model if you want to attempt to redirect your geometry.
We believe that as artists we need to be comfortable in the environment that we work in with the right tools for the job. As such we use these artist gloves (*Paid Link*) when performing more creative tasks like sculpting in Blender to reduce residue on our devices.

What Happens When You Make Bad Topology?
So it is always going to be an important step to try and create a good topology on your model, especially in circumstances where that model is going to be used for animation, 3D printing et cetera. But what happens if you create bad topology?
Well, bad topology isn’t just limited to how you use your face loops and poles. It’s also based on the general structure of your geometry and how clean it is as a whole.
For example, one instance of having a bad topology could be when you are constructing an object and then you extrude an edge by itself out of the main model.
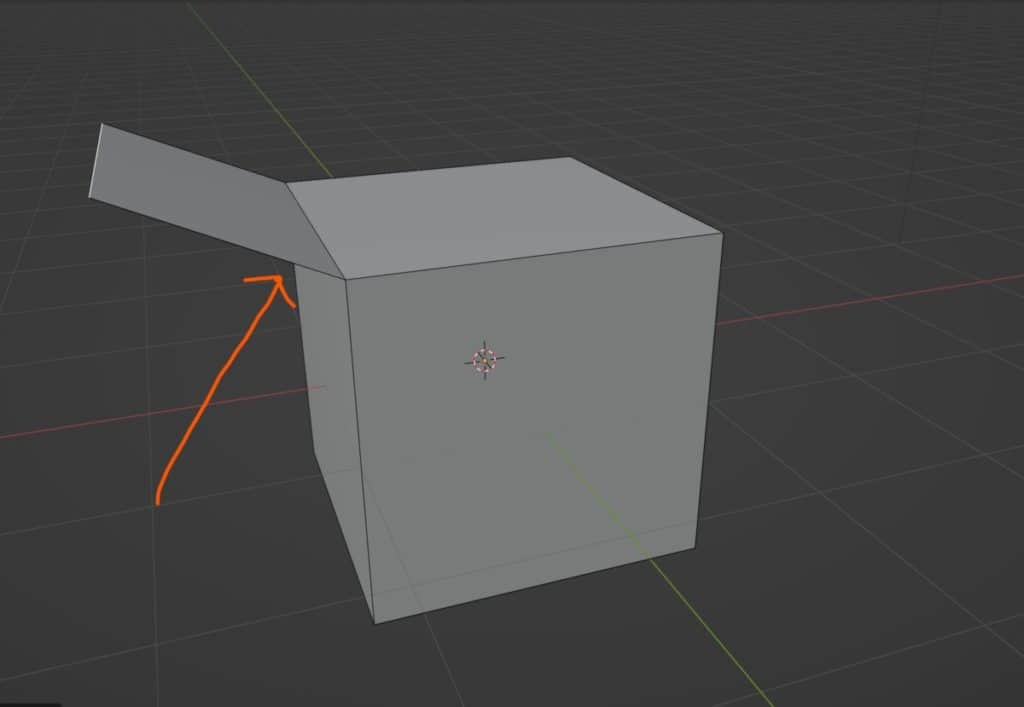
This face is known as non-manifold geometry. It’s just a flat plane that cannot exist for any real-world object. Even if the flow of the topology is fine because we are using a form of non-manifold geometry, it is defined as poor topology because the actual structure of the mesh object is not suitable for the task that it is designed for.
Another example would be when geometry overlaps. This can create what is known as shading artifacts on your 3D model when you apply smooth shading or add textures to it.
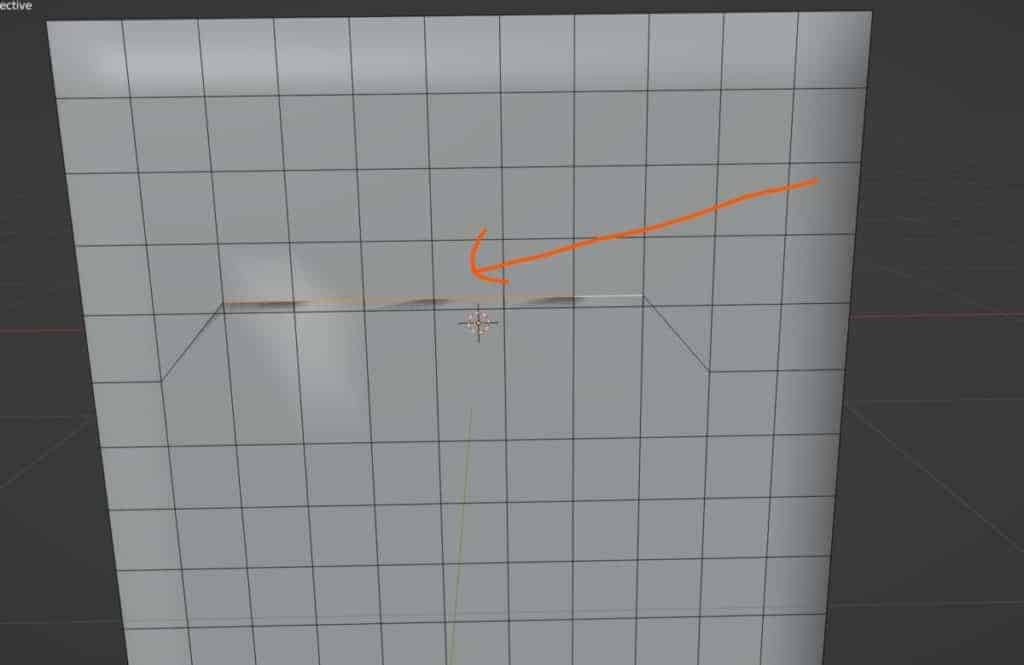
Shading artifacts can be very distracting in terms of the visual appearance and the overlapping geometry can also affect your models’ functionality If you are attempting to animate it.
It’s easy to create shading artifacts when you are using specific tools such as the bevel and boolean modifiers. It is most common when you manipulate your geometry incorrectly in edit mode or you use tools that significantly deform that geometry. Again, the Boolean modifier is an example of this.
Those aren’t the only ways to create a bad topology, and another way of creating a poor topology setup for your mesh object is to have incorrect normals on your model.
Normals in 3D modeling refer to the direction that your geometry is facing. A vertex will have an inward direction and an outward direction.
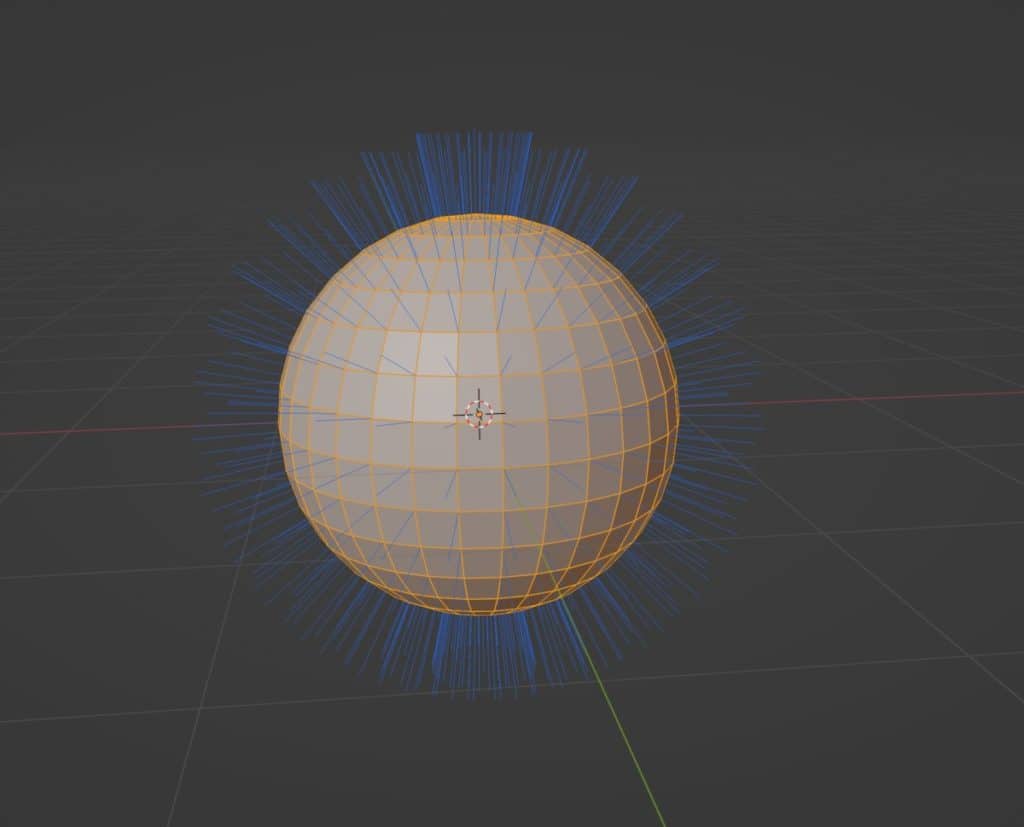
Ideally, you always want to be able to see the outward direction, or the normal, of that geometry. The same also applies to a face where it will have an inward-facing side and an outward-facing side.
In video game design, there is a process known as backface culling that ignores the inward-facing side of a face and therefore doesn’t render it.
If your normals are incorrect and the inward-facing side is pointing outwards towards the camera, then when you export that model into a game engine, that geometry will not be rendered and you’ll be able to look through your asset, which you don’t want to happen.
How To Fix Bad Topology In Blender?
So there are numerous ways in which we can create bad topology on our model. And some of these methods are not always going to be intentional. Some of them are just going to be by-products of how we construct the object in the first place. But what are the best ways to fix these options if we come across them?
Starting with the structure of our loop system, which is the actual flow of our topology. We can use tools like deleting, dissolving, and merging as a way of combining our geometry together and redefining our loops. We can also use the loop cut and slide tool to create additional loops on our 3D models.
If the problem that we have is non-manifold geometry then we need to make a decision as to whether or not that geometry is important to the shape of our model.
If it is not important to the shape of the model, then it should be deleted. If it is important to the shape of the model but is still classed as a non-manifold geometry, then we need to use a tool that’s going to make it manifold.
For example, if you have a random face that’s just sticking out of your model, but that face is actually going to be an important part of the design, then what you can do is delete the face, add a loop cut, position it underneath the original edge, and then extrude out a free dimensional face from the main object.
Because this geometry is now free dimensional with additional vertices, edges, and faces, it’s no longer classed as non-manifold geometry.
Shading artifacts are very easy to create because they can form as a result of either using a tool such as an edge slide incorrectly or using another tool like a modifier to deform your geometry.
If you come across any shading artifacts, the first thing you should try and do is go into edit mode for that model, locate where the shading artifact is and attempt to reposition the geometry there.
You can do this by pressing G twice to enter vertex grab or edge grab depending on the method of selection that you have active.
Alternatively, there are certain modifiers that can help to reset your geometry. One example of this is the subdivision surface modifier. In some cases, you can use the subdivision surface modifier to increase the amount of geometry, but because it has a smoothing effect on top of that it can reposition some of the vertices that are perhaps overlapping and get rid of that shading artifact.
Another way that you can reduce the number of shading artifacts is to use the decimate modifier, which is going to reduce the overall amount of geometry on your model.
This is counterproductive, however, as in many cases, using the decimates put modifier is going to destroy your topology as a whole, even if it does get rid of the individual shading artifacts that are located on the surface.
And if normals are your primary issue, then what you can do is go to the overlays menu in the top corner of the 3D viewport, and then select the face orientation option from this menu.
What this option will do is it will highlight your geometry in one of two colors, blue or red. The color blue indicates the outward-facing side of your normal direction. While the color is red in the case of the inward facing side of your normals.
The ideal scenario here is to not be able to see any red faces in your scene. But what you are able to do with this is select the red faces, And then access the normals menu, which you can do by holding down the Shift key and pressing N.
In the normals menu, you have a variety of options, but if you have selected all of the incorrect normals then you can just select the flip option at the top. Alternatively, you can select all of your geometry, go to the normals menu, and then select recalculate outside.
This should be able to flip all of the incorrect normals to the outside. Sometimes this option doesn’t always work, so it’s good to try this first, and if it doesn’t work, use the flip option as the backup by selecting the faces manually.
Is There A Difference Between Geometry And Topology?
While geometry and topology have different interpretations in mathematics, they both are used to represent the structure of a mesh object when it comes to Blender.
When we use the term geometry, we are referring to forms of geometry used to construct the object, such as the vertices, edges, and faces.
On the other hand, we have topology, which we use to refer to the flow of our geometry and how everything links together.
Thanks For Reading The Article
We appreciate you taking the time to read through this article and we hope that you found the information that you were looking for. We have many articles on the various aspects of Blender and have compiled a few in the list below for your reading.
- Is Blender A Good Option For 3D Animation?
- Downloading The Latest Version Of The Blender Software
- Downloading A Test Branch Of The Blender Software
- Learn To Use Tools Faster With Blender Shortcuts
- The Difference Between Subdivision Surface And Multiresolution
-
Light Baking for Blender Game Assets
Enhancing game assets with efficient light baking techniques in Blender.
-
Optimize Render Settings in Blender
Optimizing Blender render settings for quality and efficiency.
-
Node-Based Compositing in Blender
Exploring the power of node-based compositing in Blender.
BEGIN LEARNING AND DEVELOPING WITH OUR BLENDER VIDEO SCHOOL!!
Check out our course library if you are looking for a systematic and effective way to improve your skills as a 3D artist. Click Here To Learn Blender The Right Way!
