Mesh animation baking in Blender is a crucial technique for 3D artists who aim to optimize their animations for real-time applications or simplify complex scenes. Baking animation to mesh in Blender involves transferring animation data from modifiers and constraints directly onto the mesh itself, creating a more manageable file that retains the original movement. This process is essential for streamlining workflows and ensuring compatibility across various platforms and engines.
Mesh Animation Baking in Blender allows artists to preserve detailed animations while reducing system strain. It converts procedural animations into a format that’s easier to export and share. This technique is vital for game development and visual effects production.
One challenge in mesh animation baking is managing the loss of editability once the animation is baked. This hurdle leads us to explore baking animation data to mesh in Blender, ensuring the final product remains true to the original design while being fully optimized for its intended use.
Baking Animation Data to Mesh in Blender
Baking animation to mesh in Blender is a powerful process. It allows you to convert complex armature-driven animations into simpler mesh deformations. This technique is essential for game developers and animators looking to optimize their scenes.
To start baking animation to mesh, ensure your character’s rig and animation are complete. Select your mesh and go to the Object Data Properties panel. Here, you’ll find the Bake action option, which is your first step to simplifying your animation data.
Before you bake, decide on the frame range for your animation. In the Bake Action settings, set the desired start and end frames. This specificity ensures you bake only the necessary animation data.
With your frame range set, click on the Bake button within the Bake Action settings. Blender will then process each frame, transferring the motion to the mesh itself. Once done, you’ll have a mesh with baked animation, ready for export or rendering.
Ensure to save your project before baking animation to mesh. Accidents happen, and you don’t want to lose your original animated rig. Use the shortcut Ctrl + S to quickly save your work.
After baking, test your mesh’s animation in the viewport. Play the animation using the Spacebar to ensure the baking process was successful. Look for any glitches or errors that may need fixing.
Baking animation to mesh in Blender can significantly reduce file sizes. It also helps in avoiding potential lag during gameplay or rendering. This technique is a game-changer for bringing animated models into real-time applications.
Now that you understand the baking process, we’ll move on to optimizing your baked meshes for use in games and other media. This will involve cleaning up the mesh and ensuring it works efficiently within your chosen platform.
Transferring Deformation Data to Mesh
Once you have finished animating your mesh in Blender, you may want to transfer the deformation data onto the mesh itself. This process is known as “baking” and can be useful for a variety of reasons, such as improving playback performance or exporting the animation to another program.
Select the Mesh Object
Begin by selecting the mesh object in Blender that you want to bake the animation onto. This is the object that will receive the deformation data.
Access Object Data Properties
Navigate to the Object Data Properties tab within Blender. Scroll down to locate the Shape Keys section, where you will find the settings necessary for the baking process.
Initiate Bake Process
Click on the “Bake” button next to the Shape Keys list. This will open a new dialogue where you can set up the specifics of the baking operation.
Choose Bake Type
Select the type of bake you wish to perform. Common options include Shape Key or Vertex. Consider the purpose of your bake, as each type has distinct uses and limitations.
Adjust Bake Settings
Configure the settings according to your requirements. This can include setting the start and end frame for the bake, as well as specifying the range of vertices to include in the process.
Finalize Baking
To complete the process, click on the “Bake” button again. This will apply the deformation data to the mesh, baking the animation details directly onto the object.
By transferring deformation data to the mesh, you can create a more efficient and streamlined animation workflow in Blender. Explore different baking techniques and experiment with various settings to achieve the desired results for your project.
High-Resolution Meshes for Rendering and Games
High-resolution meshes for rendering bring your digital creations to life with incredible detail. These meshes contain a large number of polygons, allowing for intricate textures and realistic shadows. Yet, they can be demanding on your system, especially when animating complex scenes.
Optimizing your high-resolution mesh for rendering is essential. This process involves reducing the polygon count while maintaining visual fidelity. Use Blender’s Decimate Modifier to achieve a lower-poly version of your model without significant quality loss.
To ensure smooth animations, consider the mesh’s topology. A high-resolution mesh for rendering should have a well-structured flow of polygons. This makes deformation during animation look more natural. Use the Edit Mode to refine the mesh manually, focusing on maintaining edge loops around areas of high movement.
When preparing a high-resolution mesh for rendering in games, baking is your best friend. Baking transfers detail from the high-resolution mesh onto a texture map. Apply this map to a low-poly version of your model. Use the Render Properties panel to access the baking settings.
Remember, high-resolution meshes for rendering can elevate your project. However, they require careful preparation to be used effectively in animation and gaming. The next section will dive into the baking process to ensure your models look stunning while being performance-friendly.
Optimizing Animation for Game Engines
Optimizing animation for game engines begins with understanding the demands of real-time rendering. Games require efficient use of resources to run smoothly. Therefore, animations must be optimized to reduce processing overhead.
Animating directly within game engines can be complex and time-consuming. Importing baked animations from Blender can streamline the process. To optimize for game engines, artists first bake complex animations into simpler meshes.
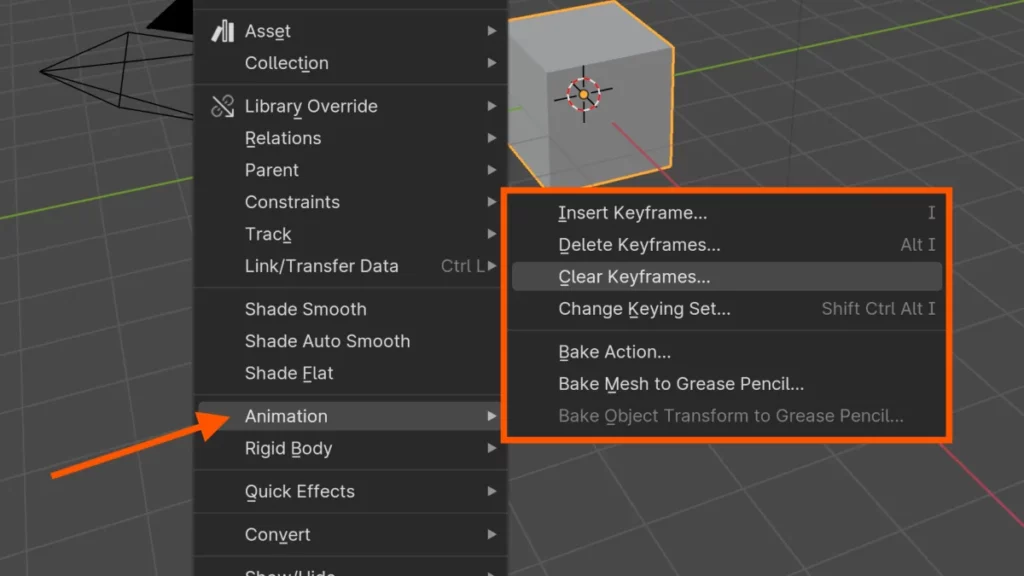
Baking the animation means transferring all movements to the mesh vertices. This is done through the Object menu by selecting the Bake Action tool. Baked animations require less computational power, perfect for game engines.
Before baking, simplify your mesh in Blender. Excessive vertices can slow down a game engine. Go to the Modifiers tab and apply a Decimate Modifier to reduce the vertex count.
Next, ensure that all unnecessary bones are removed from the armature. In Blender, select the armature, and use Edit Mode to delete extra bones. Lean armatures optimize animation for game engines by minimizing data size.
Animations must also loop seamlessly for games. In Blender, tweak the keyframes to create a smooth transition from end to start. Select keyframes in the Timeline and adjust them using G for grab.
When the animation is ready, export it to a format compatible with your game engine. Most engines prefer FBX, which supports complex animations. Use the File menu and choose Export then FBX.
Throughout these steps, remember to save your project frequently. Unexpected crashes can occur, risking unsaved progress. Press Ctrl + S regularly to save your work.
Optimizing animation for game engines is a skill that enhances gameplay and user experience. With these techniques, your baked animations from Blender will help your game run more efficiently. Our next section will dive deeper into the specifics of animation loops and transitions, ensuring that your game’s animations are not only optimized but also visually appealing.
Exporting Blender Animation Data
Exporting animation data from Blender is essential when you’re aiming to use your animations in other applications. The process begins by ensuring your mesh and its associated armature have all their actions fully keyed. Open the File menu and choose Export to select the desired file format for your animation.
Different formats serve different purposes when exporting animation data. For games, the FBX format is commonly used and can be found under File > Export > FBX. Confirm that the animation checkbox is selected to include the keyframe data.
Before exporting animation data, adjust the settings specific to your chosen format. For FBX files, you’ll need to visit the Animation tab and ensure the ‘Baked Animation’ option is ticked. This bakes the keyframes to ensure smooth playback in other software.
Make sure to select only the objects you wish to export by using the Ctrl + Click method. This level of control prevents you from including unwanted items in the export. Then, with the appropriate mesh and armature selected, click Export FBX to save the file.
Always double-check the exported animation data in your target application. This avoids unexpected issues and confirms that the export was successful. Compatibility is key, and testing helps iron out any kinks in the animation transfer process.
The next step once your animation data is exported is to import it into your destination program. Keep in mind that each software has its import peculiarities, which we will explore in the following section.
Streamlining Blender Animation Workflows
Mastering Blender animation workflows is vital for streamlining your 3D animation process. Beginners often face confusion when dealing with complex animations. By learning to organize and bake animations, you’ll save both time and computing resources.
Understanding the timeline and keyframes is the first step to efficient Blender animation workflows. Select your object, go to the timeline, set a keyframe by pressing I, and choose your animation property. Practice this to get comfortable with the basic flow of animation work.
Blender allows animators to translate complex movements into simpler, manageable data through baking. In the Graph Editor, use the bake action function to convert your animation into keyframes. This retains your animation’s integrity while making it less resource-intensive.
Using Blender’s Non-Linear Animation (NLA) editor can simplify managing multiple animation clips. Start by creating your animations in the Action Editor. Push them as strips onto the NLA editor to blend or sequence animations seamlessly.
Organizing your animation work files and naming conventions is crucial. Use descriptive names for actions and assets within the Outliner. This makes revisiting and modifying your projects less confusing.
Shortcuts can significantly speed up Blender animation workflows. Familiarize yourself with time-saving keys, like Shift + E for setting an ease type for keyframes. Shortcut mastery will make the process faster and more intuitive.
Remember, practice makes perfect. With patience and repetition, these techniques will become second nature. Get hands-on and continually refine your Blender animation workflows for smoother projects.
BEGIN LEARNING AND DEVELOPING WITH OUR BLENDER VIDEO SCHOOL!!
Check out our course library if you are looking for a systematic and effective way to improve your skills as a 3D artist. Click Here To Learn Blender The Right Way!
