In the realm of 3D rendering, visual realism hinges on numerous factors, one of which is the accurate portrayal of depth. Adjusting view focal length in Blender, a leading open-source 3D graphics software, is a crucial step artists can take to enhance the illusion of depth in their digital scenes. This technique not only contributes to the aesthetic appeal but also to the authenticity of the rendered images.
Depth perception in Blender hinges on the correct focal length setting. Tighten this to add impact and drama. Widen it to establish expansive vistas.
One common hurdle creators encounter is achieving the desired depth of field in their Blender renders. Overcoming this challenge is vital for visual storytelling. Therefore, we pivot to Exploring Blender Camera Focal Length Settings: A Beginner’s Guide, where we dissect the nuances of camera settings to create compelling 3D art.
Exploring Blender Camera Focal Length Settings: A Beginner’s Guide
Understanding the Blender Camera Focal Length Settings is essential for achieving the correct depth perception in your 3D renders. Focal length, measured in millimeters, controls the magnification of your scene. Adjusting this can either squeeze your subject into a tight frame or expand the view for a panoramic effect.
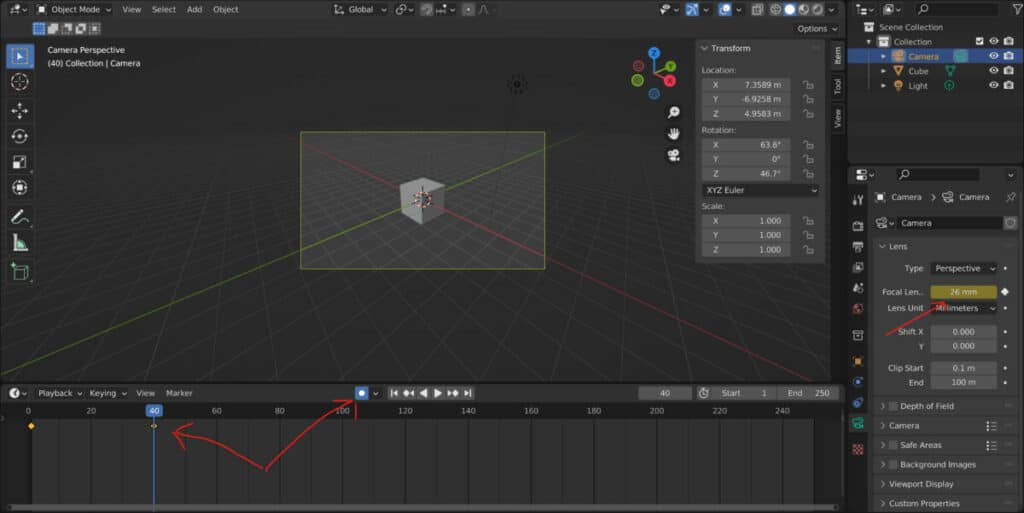
To adjust the focal length in Blender, you will use the Camera panel. If you have a camera in your scene, select it and look in the Camera tab on the right-side Properties shelf. Here, you’ll find the Focal Length options where you can enter the desired millimeter value.
Experimenting with different focal lengths is a powerful practice. A lower value will give you a wider field of view, suitable for landscapes or architecture. A higher value, on the other hand, zooms in closer, perfect for detailed portraiture or macro shots. Remember, the most common mistake is overlooking composition when altering the Blender Camera Focal Length Settings.
Now that you’re familiar with adjusting the Blender Camera Focal Length Settings, take the time to apply this knowledge. Start by arranging a simple scene and try taking shots at various focal lengths. Notice how each setting changes the relationship between objects and the overall feel of the image. With these basics in hand, let’s move on to understanding the impact of aperture and depth of field for truly lifelike renders.
Mastering Adjustments: Fine-Tuning View Focal Length in Blender
As you embark on your journey through Blender, one key element to grasp is how to convey depth in your renders effectively. It’s like painting a picture that leaps off the canvas, inviting viewers into your digital world.
Understanding Depth Perception
At the heart of creating immersive scenes is the concept of depth. By tweaking the Camera Properties, particularly the Focal Length setting, you can infuse your scene with a sense of scale and depth, making your renders more captivating.
Getting Started with Camera Settings
To begin, select your camera in the scene. Then, head over to the Camera Settings tab. Here, you’ll find the Focal Length option. Adjusting this setting allows you to control the sharpness of your scene and the spatial relationship between objects.
- A shorter focal length (wide-angle) expands your field of view, bringing elements closer and enhancing perspective. This setting is perfect for showcasing vast landscapes or intricate architectural designs.
- A longer focal length (telephoto) compresses your field of view, making the scene appear flatter and more condensed. This choice is ideal for portraits or detailed product shots.
Practical Adjustments
Experimentation is key. Play around with different focal lengths to discover the perfect setting for your scene. Keep in mind, even minor adjustments can significantly alter your render’s impact.
To adjust the focal length, simply type in your desired value while your camera is selected. For a hands-on view of these changes, switch to camera view using the shortcut Numpad 0. This real-time feedback will help you understand how each tweak modifies your scene’s depth and composition.
Finding Your Visual Voice
Think of adjusting the focal length in Blender as fine-tuning a musical instrument. Each adjustment contributes to the overall harmony of your scene. Whether you aim to convey the grandeur of a landscape or the intimacy of a close-up, mastering this tool will enhance your storytelling capabilities.
Remember, your choice of length can dramatically influence the mood and narrative of your render. A broader view introduces a sense of openness and scale, while a closer, more focused view can create an intimate atmosphere.
Crafting Your Masterpiece
As you grow more comfortable with these adjustments, you’ll find that manipulating the focal length becomes second nature. Each choice you make adds a layer to your visual narrative, allowing you to create more dynamic and emotionally resonant renders.
In the next section, we’ll explore how combining lighting with focal length adjustments can further enhance depth, bringing your scenes to life with even greater realism.
Perspective & Depth: Leveraging Blender’s Focal Length for Enhanced Visualization
Understanding Blender perspective and focal length is essential for creating realistic 3D scenes. Focal length in a camera determines the angle of view and thus affects the perceived depth in an image. To access this in Blender, navigate to the Camera properties panel.
To adjust it, select your camera and press N to open the properties shelf. Look for the Lens section, where you can change the focal length value. A lower number gives a wider angle and exaggerates depth, while a higher number flattens the perspective.
Keep in mind that Blender perspective and focal length settings can dramatically alter the mood of your render. Experiment with different values to convey the right emotion or story. For example, a wider angle can create drama, while a longer length can provide a sense of calm.
When you master Blender perspective and focal length, your renders stand out with more depth and realism. Stay in tune for the next section, where we’ll explore lighting techniques that complement your newfound perspective skills.
Cinematic Flair in 3D: Adopting Cinematic Camera Techniques in Blender
Incorporating cinematic camera techniques in Blender can transform a simple 3D render into a visual masterpiece. By adjusting the view focal length, depth perception is enhanced, creating a more immersive scene. This technique borrows from the film industry, where the tool sets the mood and guides the viewer’s focus.
Understand that in Blender, the camera acts much like a real-world camera. Explore the Camera Properties panel to find focal length options. Change these settings to mimic wide angle or telephoto lenses, common in cinematic productions. Wide angles offer more depth, while telephoto lenses compress the scene, changing how users perceive the space.
Embrace the power of depth of field to add cinematic camera techniques in Blender to your toolkit. By adjusting the Aperture settings, you can dictate where the viewer’s eye should go. A shallow depth of field blurs the background, making the foreground pop. To adjust this setting quickly, select your camera and press F2, opening the depth of field options.
Applying cinematic camera techniques in Blender is about more than just technical adjustments; it’s storytelling. Each choice, from lens type to depth of field, serves the narrative. With these tools, you can invite your audience into the world you’ve crafted. The next section will delve into framing and composition, crucial counterparts to the camera techniques just discussed.
Optimizing Your Scene: Strategic Blender Render Camera Setup
In Blender, mastering the Render Camera Setup is key to producing eye-catching visuals. It’s the virtual lens through which audiences experience your scene. Start by selecting your camera in the 3D Viewport; press N to bring up the Properties panel where you’ll find essential camera settings.
Adjusting the setting in the Camera Properties tab directly affects the depth perception of your render. A shorter focal length captures a wider scene, which is great for landscapes. Conversely, a longer focal length zooms in for intimate portraits or detail shots.
Placement is crucial in a solid Blender Render Camera Setup. Remember, your camera’s position will dictate the composition and storytelling of your render. Use the G key to move the camera and R to adjust its rotation, looking for the most engaging angle.
The depth of field settings will add realism by blurring objects outside the focal plane. Navigate to the Camera Properties and find the Depth of Field section. Adjust the F-stop value to control the blurriness, mimicking how different camera lenses behave in real life.
Lastly, checking your final composition from the camera’s perspective is vital. Hit 0 on the numpad to toggle the camera view. This ensures you haven’t missed any unwanted elements lurking at the edges of your frame.
This strategic approach to the Blender Render Camera Setup will lead to more dynamic, impactful renders. Fine-tuning camera settings will make your scenes pop with life and dimension. As we move forward, remember that lighting plays a complementary role to the camera, enhancing textures and mood.
Achieving Hyper-Realism: The Role of Focal Length in Blender Renders
When you dive into the world of 3D design with Blender, mastering the Blender Focal Length for Realism is key. A proper focal length can make or break the illusion of depth in your renders. Choosing the right setting mimics how our eyes perceive the real world and how cameras capture it.
To adjust the focal length in Blender, first, select the camera object. Then, navigate to the Camera Properties panel. Look for the Focal Length setting; this is where you’ll implement changes for realism. An ideal focal length ranges from 35mm to 50mm for scenes that resemble human eye perception. However, for more dramatic effects, you might experiment with wider or narrower lengths.
Be mindful that focal lengths can distort your scene if not used wisely. A short focal length exaggerates perspective, which might be great for landscapes, but less so for portraits, where it can warp features. Use the Numpad 0 to toggle the camera view and assess the impact of your adjustments in real-time.
Remember, practice is essential when mastering Blender Focal Length for Realism. Experiment with different settings to see how they affect the mood and authenticity of your scene. By adjusting the focal length, you control the story told by each render. Keep the focal length consistent with the scale of your scene to maintain a cohesive and realistic appearance that captivates your audience.