3D modelling applications can be used to create accurate representations of real-world objects. But for them to be truly accurate, the models need to be using the correct values for their dimensions. Dimensions, which we will refer to here as the units of measurement, play an important role in architecture, physics simulations, and in 3D printing.
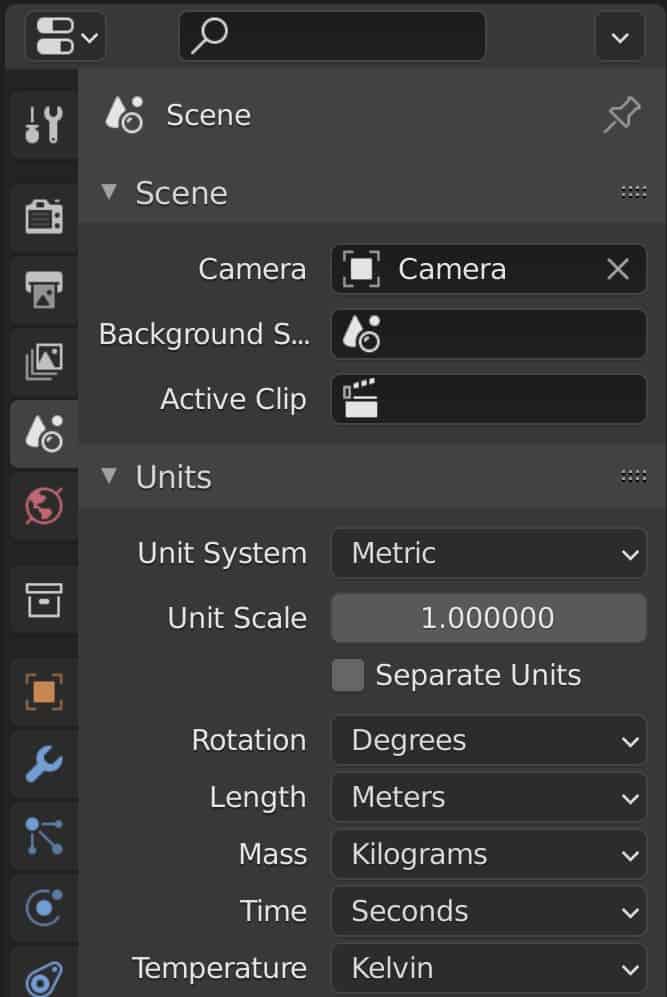
You can change the active units of measurement by going to Properties > Scenes > Units, and changing the unit system to the measurement system that you want to use.
Then change the length attribute to best represent the size of the objects that you are trying to create. For example, a pencil would be best suited with centimeters and a large space station could use kilometers.
It is very easy to miss for a beginner and while it does not matter so much when you are simply creating objects for a scene render in Blender itself. Problems can occur if the unit of measurement is too large or too small for an external purpose like game design or 3D printing.
What Are The Blender Units Of Measurement And Why Are They The Default?
Blender Units are the default system of measurement that Blender uses if no real-world systems have been assigned. They are easy to work with for beginners and can be used for creating objects and scenes of various sizes.
The Blender unit most closely resembles metric meters in terms of the actual size of the objects that are created. If you open up the side panel in the 3D viewport, you will be able to see which unit system is being used for the current project by looking at the values for the location, rotation, and scale of the selected object.
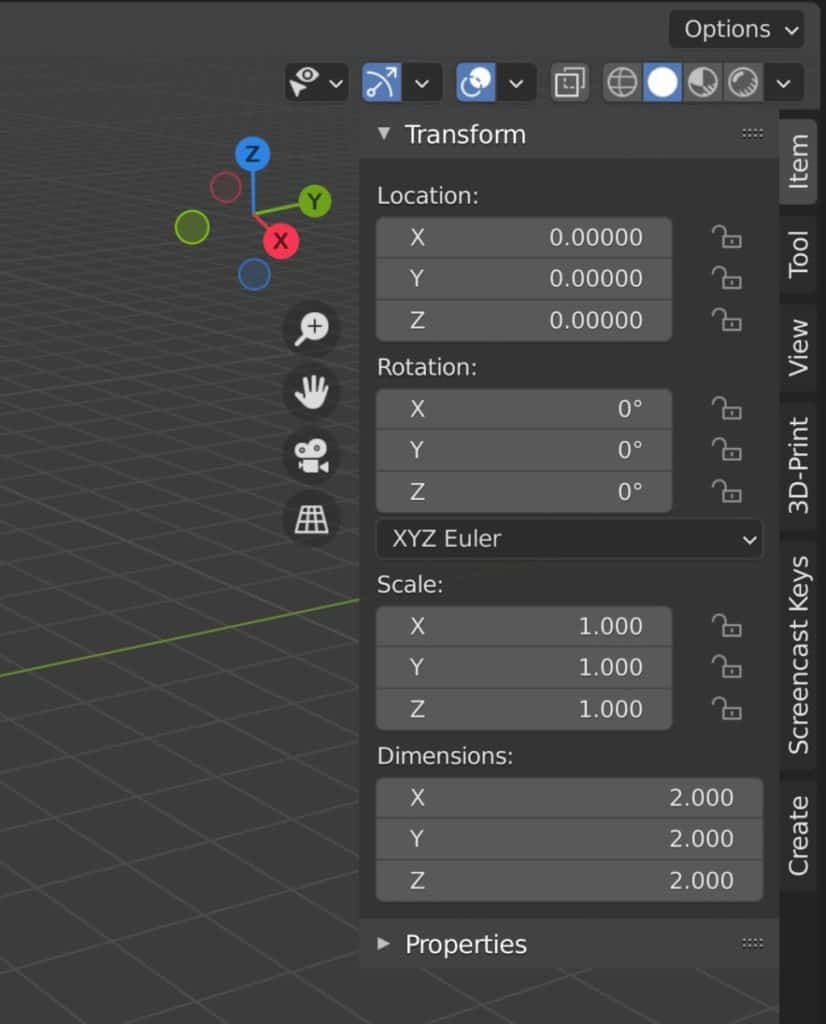
If Blender units are applied as the system of measurement, then you will only see float numbers for location and dimension.
Even in this system, you are still using degrees for your rotational values but none of the other Unit attributes can be changed.
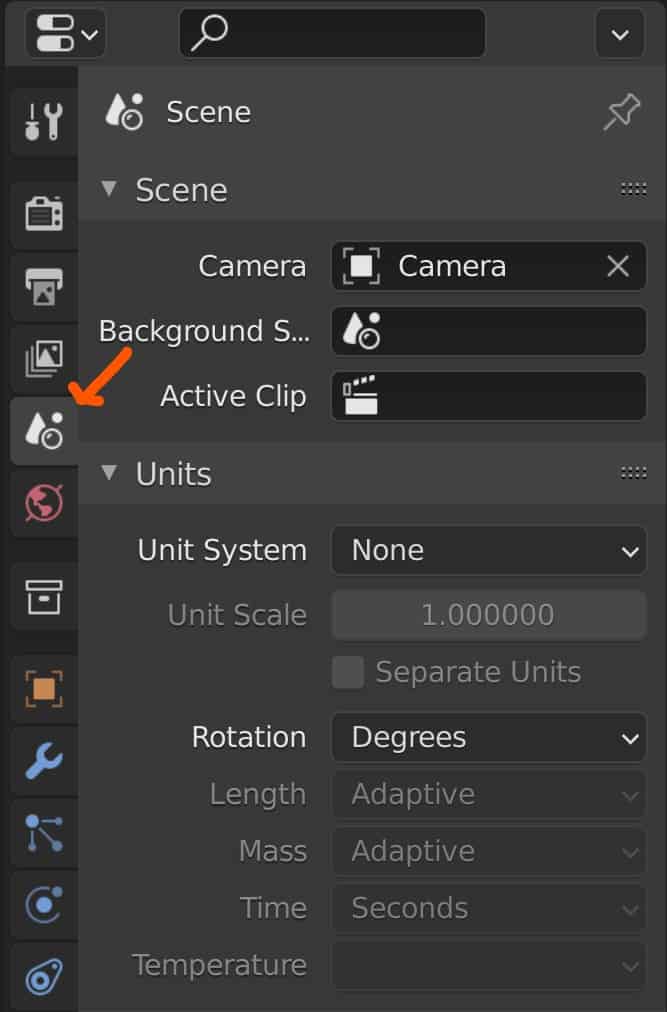
A unit attribute is a parameter that influences how the unit system is calculated in the scene. Go to Properties > Scenes > Units and you will see the current option for your unit system as well as the following attributes:
- Unit Scale (Slider)
- Separate Units (Checkbox)
- Rotation
- Length
- Mass
- Time
- Temperature
If you are using Blender units as your system of measurement, then the unit system option will appear as none and all of the attributes apart from the rotation will be greyed out and nonselectable.
You can change your unit system here to either metric or imperial. If you are not sure about which to choose, In Europe, the metric system is used to calculate in millimeters, centimeters, etc. While America uses the imperial system for inches, feet, yards, etc.
5 Reasons Why You Should Change Your Units Of Measurement?
To achieve accurate and realistic results in Blender, it is important to change the units of measurement for 3D modeling according to your needs and preferences. Here are five reasons why:
- Changing the units of measurement can help you match the scale of your 3D models to the real-world objects they represent. For example, if you are modelling a building, you could use meters or feet as your units of length, rather than Blender Units (which are equivalent to metric meters by default).
- It also helps you communicate with other 3D artists, clients, or collaborators who might use different systems or standards. For example, if you are working on a project that requires imperial units (such as inches, feet, yards, etc.), you can easily switch to that system in Blender and avoid confusion or errors.
- It can also help you prepare your 3D models for different purposes or outputs, such as rendering, animation, physics simulation, or 3D printing. For example, if you are planning to 3D print your model, you might want to use millimeters as your units of length, since most 3D printers use that unit for slicing and printing.
- Changing your units can also help you control the level of detail and precision of your 3D models. For example, if you are modeling a small object with intricate details, you might want to use smaller units of length, such as centimeters or millimeters, to achieve finer control over your mesh and vertices.
- It also helps you visualize the dimensions and proportions of your 3D models more easily and intuitively. For example, if you enable the viewport overlays option for edge length and face area in Blender, you can see the measurements of your selected edges and faces on your screen in your chosen units.
When Should You Change Your Unit System And Parameters?
If you are designing a scene specifically for rendering within Blender, then changing the unit system will not really make a difference so long that the objects themselves are the correct size when compared to each other. Here the standard Blender units system will do the job nicely.
Where the scale of the object becomes important is in any situation where the 3D models will be exported to another program.
For example, a common use of Blender is to create objects for video games, meaning that the objects will need to be exported to a game engine.
Game engines will have their own systems for object behavior, physics simulations, etc. And so the object that we export will need to be the correct size and scale for those physics simulations, otherwise, the behavior may not be what we expect.
Other situations where you will need to make changes to your unit system will be for creating physical products through architecture, manufacturing, and 3D printing.
Basically, if the purpose of a model is to be used exclusively within Blender, then you do not need to change the unit settings. If the purpose is external, like in game design, then the unit system becomes much more important.
What Can Go Wrong If You Do Not Change Your Unit System?
That depends on what you are trying to do with your object. As mentioned above, in game design the scale of the model should be correct for the scene that it needs to be imported into. Incorrect sizing can be adjusted and corrected in the game engine itself, but it is better to make sure that your dimensions are correct before exporting from Blender.
This way you know that there are fewer things that can go wrong with an asset when you begin to use the model for animations, physics simulations, etc.
Another thing to be careful of is the scale value. If you look at the side panel in Blender you will notice that the scale values remain the same regardless of the unit system that was used. This is because the scale is relative to its original size, and the dimensions are the true values for the size of the object.
When these scale values are set to something other than one it can cause incorrect behaviors even if the unit system and length were correct.
To apply your scale, select the object in Blender and use the hotkey of Control + A to bring up the apply menu, then select rotation and scale to apply those transforms.
How Can The Unit Scale Value Help In Modelling?
The unit scale is a universal scale system that you can use to increase or decrease the size of your models all at the same time.
Let’s say you began a project creating a low poly city with buildings of various shapes and sizes, mostly built around cube objects.
You set up the look of your scene so that everything looks to be the correct size. However, you then notice a problem when you check the transforms.
Your tallest building is only 12 meters high when it should be 120. All of the buildings look right, but they are all smaller than what they need to be.
Instead of having to go in and manually change the scale of each object, you can adjust the unit scale value in the properties panel. So in this case, we can increase the unit scale to 10 to make all the objects 10 times the original size. You can double-check this by looking at the object’s dimensions.
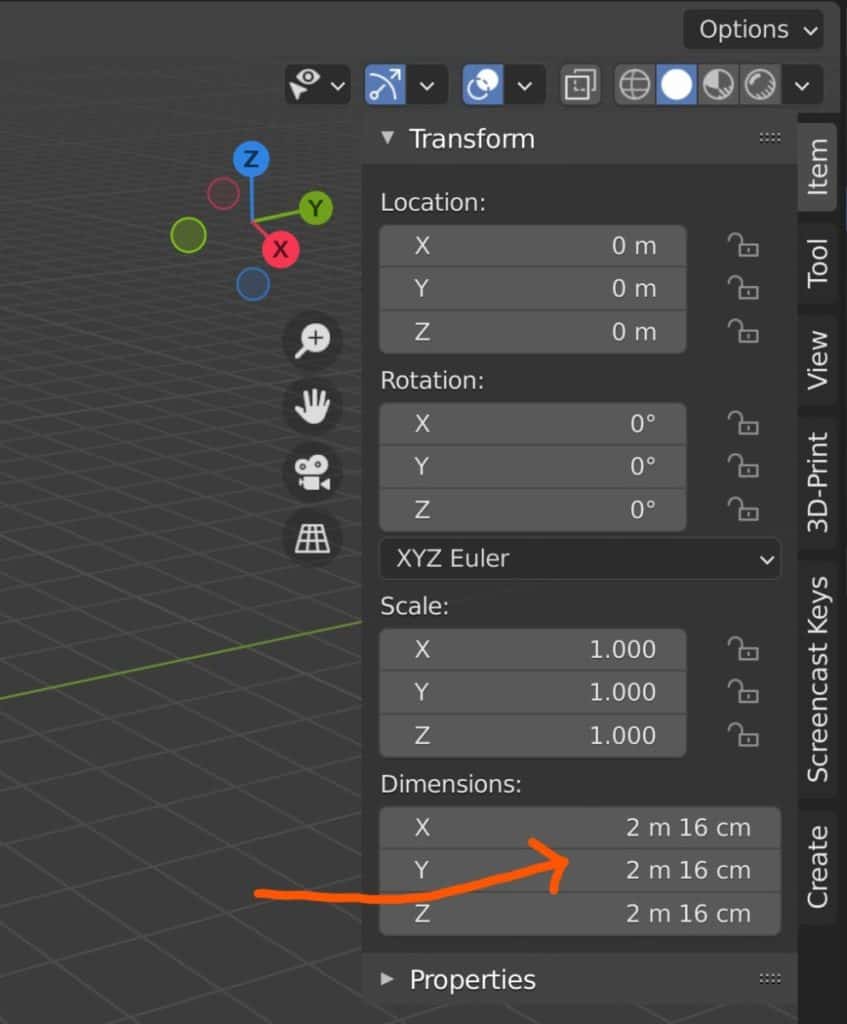
Another useful tool here is the separate units option found just below the unit scale. When this option is ticked the dimensions are split to become easier to read. For example, 20.1 meters will become 20m 10cm, and so on.
Keep in mind that adjusting the unit scale works for the objects that are currently in your scene. Adding a new object after changing the unit scale will still result in that object having its original dimensions, meaning it may appear much larger or smaller than the rest of your scene.
Does The Unit System Effect Clipping?
Clipping is the effect where the viewport cuts out detail after a certain point, whether that be from zooming too far in or too far out of your scene.
You can access the clipping values by pressing N to open up the side panel, then going to View (Tab) > View and changing the clip start and clip end values.
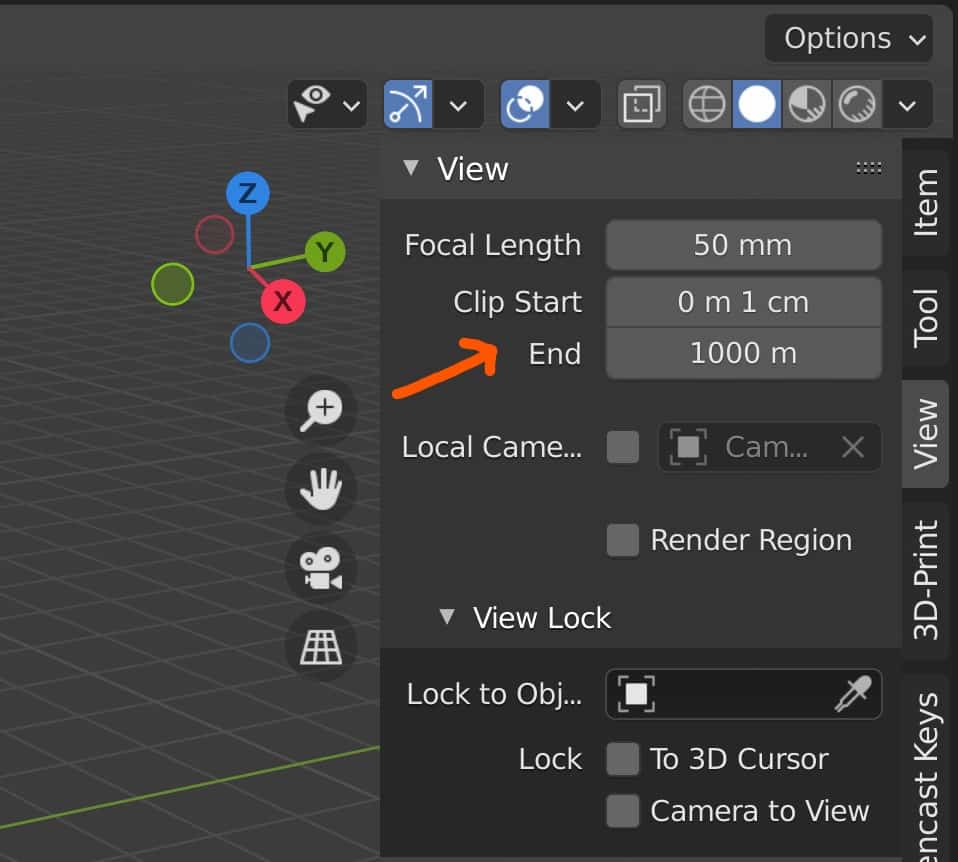
If you are using the metric system with meters as the length, then the lowest value before clipping occurs will be 1cm, while the highest point will be 1km.
Note that the clipping values are dependent on the unit scale value, so changing the unit scale will alter the start and end values in real-time.
Thanks For Reading Our Article
We hope that you enjoyed reading our article on the unit systems in Blender. Below we have gathered a shortlist of other articles we think you may be interested in.
- How To Use The Camera In Blender For Beginners?
- Changing The Color Theme Of The Blender Interface
- How To Navigate 3D Space In The Viewport?
- How To Isolate A Single Object In Your Scene For Editing?
- Why Can I Not Zoom Into My Viewport Anymore?
-
HDR Lighting: Blender Environment Tips
Achieving natural lighting effects with HDR environments in Blender.
-
Blender’s Ambient Occlusion: Depth Tricks
Enhancing depth and realism with ambient occlusion in Blender.
