Question, what first attracted you to learning Blender? The answer for most people would be the prospect of creating game assets for use in their own video games and potentially becoming a game designer. therefore one of the core skills that we need to learn is how to successfully export a 3D model from Blender to a dedicated video game engine like Unreal engine.
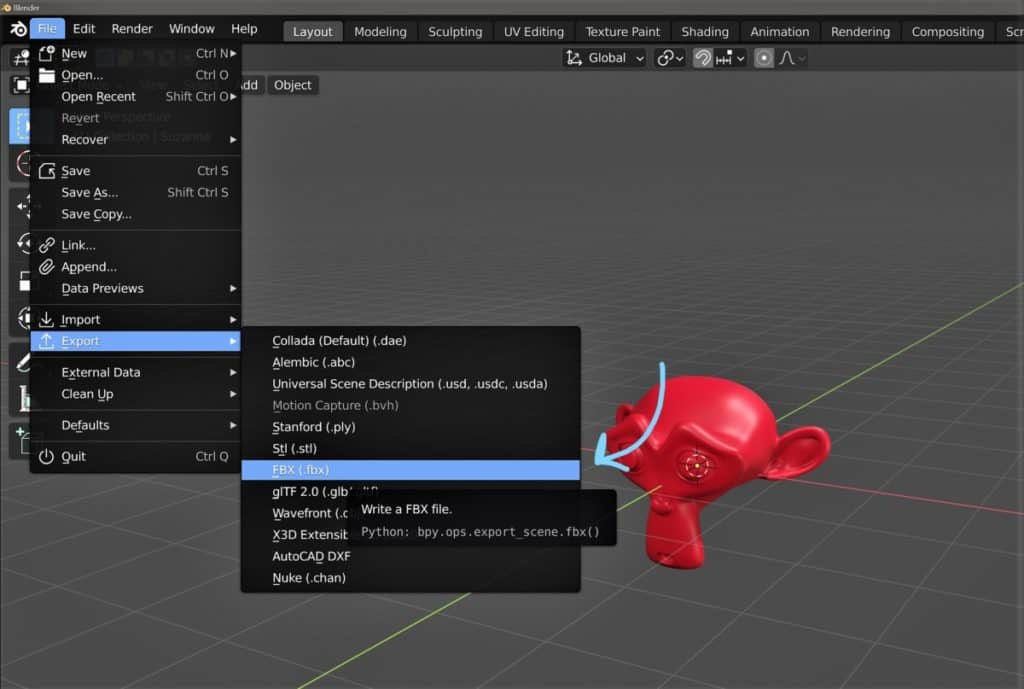
To export an object from Blender and import it into Unreal Engine, Go to File>Export>FBX and make sure you set the correct parameters. Select the mesh and armature object types, assign a forward direction of X, up direction of Z, and click the apply transform button, then click export. Then go into Unreal Engine and bring your file into the asset folder to use in your project.
For game engines, the FBX file format is the primary choice for bringing in game assets of all kinds, due to the amount of data that it can store, but there are also a few alternatives.
We also cover how to export your assets to the Unity game engine as well. You can view that article here.
Preparing Your Asset For Export
The first step in our process is, of course, creating the game asset in Blender. For illustrative purposes, let’s consider you’ve sculpted an intricate medieval castle, ready for animation in your game.
- Proper Scaling: Ensure that your castle adheres to the real-world scale. This ensures consistency when imported into Unreal Engine. The default measurements in Blender are in meters, aligning with Unreal Engine.
- Texture and Material: Make your castle visually appealing by applying suitable textures and materials. Ensure to use PBR materials, which translates better into Unreal Engine.
- Apply Modifiers: Once you’ve finished designing, apply any modifiers in the modifier stack. This could include bevels, mirrors, or multi-res modifiers. To apply these, select the modifier, then click ‘Apply’.
- Good Topology: Ensure that the topology of the model is in a good state, with strong geometric flow and correct normals around the asset.
In addition to these steps, make sure that you have correctly created your rigs and animations if you plan to animate the asset in your game engine. Things like lighting and camera work are optional due to their existence in Unreal.
Choosing the Correct File To Export?
Different applications will require you to use different file formats depending on the data that is required. From a 3D standpoint, one file format may be able to transfer animation data, while another may also allow for the transfer of material data.
A game engine may require a different file format to a 3D texture application and so on. Therefore we need to know which file formats are compatible with both Blender and Unreal Engine, which also allow for the correct data blocks to be transferred.
There are two categories first of all that we can position our formats in, these are proprietary and universal. A proprietary format is one that is dedicated to a specific application, for example, Blender uses the blend file extension for all its projects.
In some cases, these can also be used in certain applications like a game engine by saving that blend file in the game engines project asset folder. There are advantages and disadvantages to this approach, but more on that later on.
The other category we have is the universal format for our file types. the Universal format is used to be able to transfer data from one application to another, which makes it perfect for the purpose of sending a game asset from Blender to Unreal Engine.
The right file format for you will need to use for both of our given applications, and will also need to allow for the correct data to be transferred. So if you need to send over an npc with a walking animation the file format needs to be able to accommodate both the geometry data as well as the animation data. Examples of universal file formats include but are not exclusive to, Collada, FBX, and OBJ.
Exporting From Blender Using The FBX Format
The most common option for exporting a game asset from Blender is to use the FBX file format. Originally a proprietary format for Kadara, the format was licensed by Autodesk in 2006 and has been used since as a means of transferring data from one application to another.
Despite its origins and its affiliation with Autodesk (The creators of MAYA and 3DS MAX), the file format can be used in Blender in the form of an addon. These are effectively plugins that improve the base functionality of Blender. Fortunately, you do not have to enable this addon in order to use it as it is already available for use with any build of Blender.
Normally, addons would need to be enabled in order for you to use them by going to the preferences panel and ticking the box next to each add-on you want to enable. But some addons are so useful that they are enabled by default, and the FBX add-on is one of them.
To export your model from Blender and then import it into Unreal Engine, follow the steps listed below.
Step One
To export a game asset from Blender as an FBX file, and then reimport that file into Unity, first go to File>Export>FBX. This brings up the file browser with a series of parameters at the side. If you don’t see these parameters, then press the N key.
Step Two
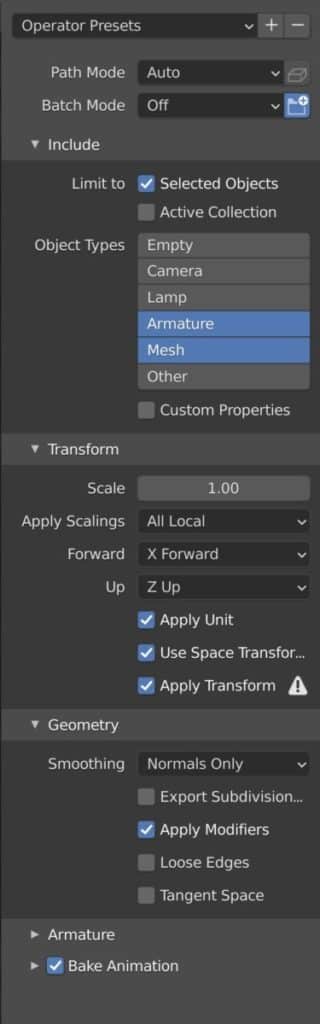
Next, we need to set the parameters to match what we want to be exported to Unreal Engine. Tick the box labeled ‘Selected Objects’ to only export objects that are selected for the export, and if your model was not previously selected go back and do so.
Then you have a list of object types that can be exported, select the ones that will be relevant to you. In most cases, this will involve selecting the mesh object type, which will be the asset itself, and the armature that the model is connected to for the animations.
It’s unlikely that you will need to export the camera, lights or empties so uncheck these options.
Then you need to define the parameters for the forward and up directions of the model, to tell Unreal Engine what way the object needs to face when being imported. Blender normally uses a different coordinate system to game engines and so we need to determine the new orientation.
For Unreal Engine set the forward direction to the X-axis and then the up direction to the Z-axis. By comparison, in Blender the Y-axis is forward and the Z-axis is up.
Also, make sure to click the apply transforms button and bake the animation data if you have any.
Step Three
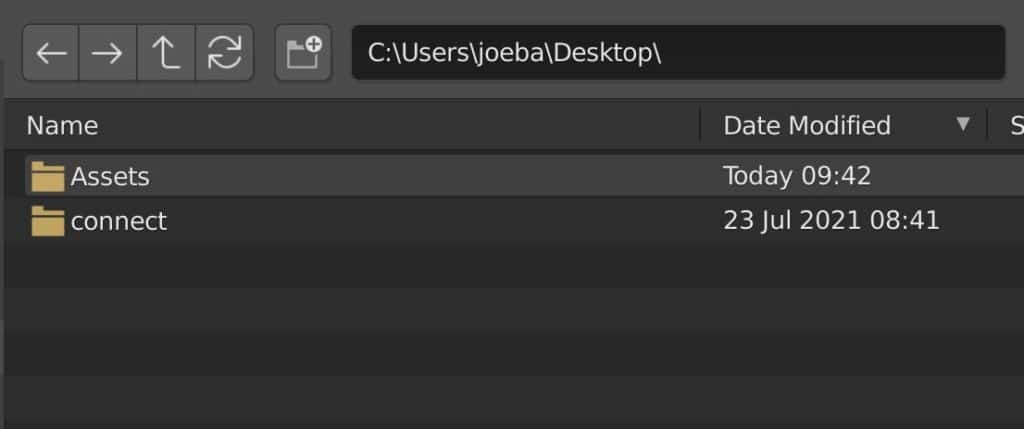
With the parameters set locate the folder that you wish to save your asset in. Make sure that the location is easy for you to access so that you can quickly reach the asset. For example, create a folder on your desktop named assets and export any of your meshes to that folder, making it easy to access for any application.
Alternatively, if your asset is specifically for a single project, then you can locate the asset folder for that project and export your FBX directly to that asset folder, making it instantly accessible the next time you go into Unreal Engine.
Step Four
Go over to your project in Unreal Engine, or create a new one from scratch. In your project, you will want to create an assets folder to store all of your game assets in your project. Just go to the content tab, click add new, and create a new folder.
Then create some subfolders inside of your assets folder to categorize your assets based on type. The three folders to start with should be Materials, Textures, and Meshes. Select the Meshes folder as the location to import your asset.
Then click on the big import button that you see in the content tab and locate the file directory where you stored the asset, select the asset and then click import. By the way, you can import multiple mesh and texture files at the same time here, so select what you want to bring in before clicking the button.
You should then see a pop-up window that will allow you to change some of the parameters for your import before you confirm.
If everything has been done correctly, you will want to keep the transform values as the defaults. If you are looking to bring in your material and texture data, check the box that is labeled as ‘Import Textures’ if you have any png or jpeg files that you are also importing.
If you created materials in Blender, change the Material Import Method to the ‘Do Not Create Materials’ option to use the materials that you will be importing with your FBX file. Remember that any textures assigned to these materials will also need to be imported as well.
When you are ready, click the import all option to bring in your assets.
By following the above steps you should now be able to export your 3D models from Blender to Unreal Engine using the FBX method.
Exporting From Blender Using The OBJ Format
The second option for exporting a 3D file from Blender for use in Unreal Engine is to use the OBJ file format. This is a more geometry-focused format that only transfers data relative to the object itself. Data for things like animations and materials are not packed into the OBJ format, but there are workarounds for both data types.
The OBJ format was developed by a company called wavefront and its simplicity makes it a great option for exporting when you only want to use the mesh itself and then create the materials and animations in Unreal Engine.
This format allows you to export the following data from a 3D scene…
- Geometry
- Vertex Data
- Normals
- UV Data
To successfully import an OBJ file into your Unreal Engine project, complete the following steps…
Step One
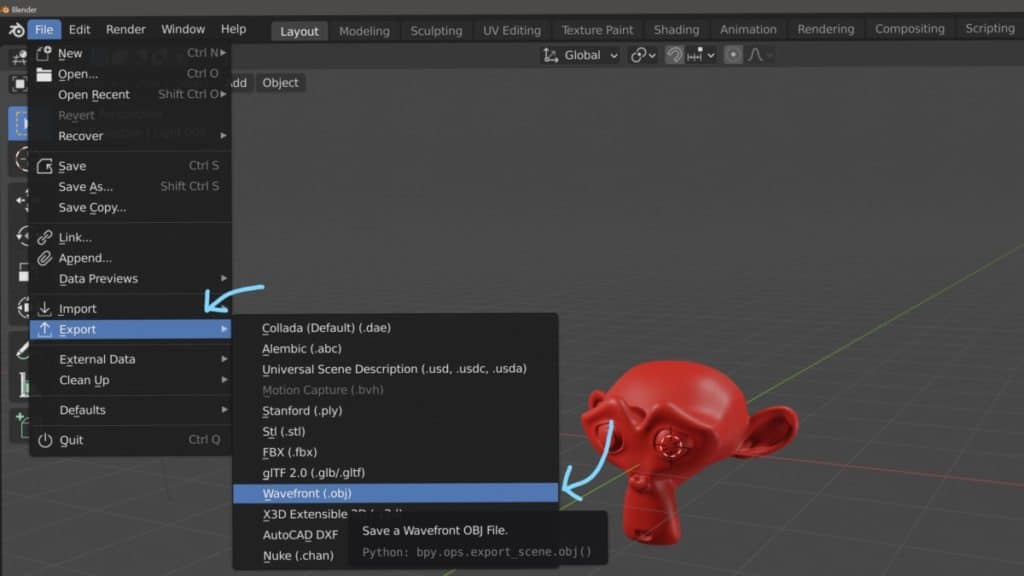
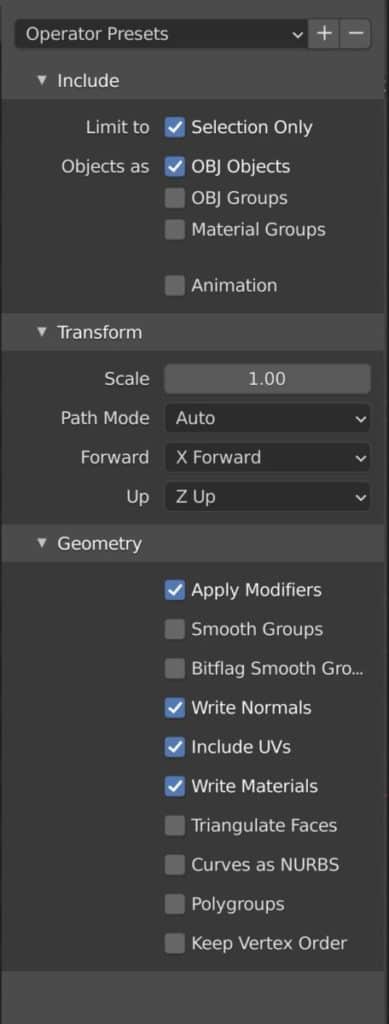
To export your object as an OBJ file, first go to File>Export>Wavefront (.obj). This brings up the file browser with a series of parameters at the side. If you don’t see these parameters, then press the N key to make them visible.
Step Two
Set the X-axis as the forward axis and the Z for forwards. Also, tick the selection only box if you want to export a specific model in a scene. Under the geometry tab, make sure to tick the apply modifiers option to confirm any modifiers that are active in Blender, as well as the ‘write material’ option to create a second file for your materials, which will be an MTL file.
Step Three
Choose the asset folder of your Unreal Engine project as the location for your export, this will make step four easier. Or you can save it in a location that is easy to access for any application, like the desktop. Then click the export button to complete the process.
Step Four
Go over to your project in Unreal Engine, or create a new one from scratch. In your project, you will want to create an assets folder to store all of your game assets in your project. Just go to the content tab, click add new, and create a new folder.
Then create some subfolders inside of your assets folder to categorize your assets based on type. The three folders to start with should be Materials, Textures, and Meshes. Select the Meshes folder as the location to import your asset.
Then click on the big import button that you see in the content tab and locate the file directory where you stored the asset, select the asset and then click import. By the way, you can import multiple mesh and texture files at the same time here, so select what you want to bring in before clicking the button.
You should then see a pop-up window that will allow you to change some of the parameters for your import before you confirm.
Troubleshooting Steps For When The File Does Not Import Correctly
There are a few things that can go wrong when transferring data from one application to another, as the settings need to match between the two applications when exporting the model, ie the export parameters. Let’s take a look at a few of the more common issues when exporting from Blender to Unreal Engine and how we might be able to fix them.
Incorrect Scale And Rotation
One of the most common issues artists will face will be incorrect transforms like rotation and scale. This normally occurs when we export a model that has an altered rotation value and/or a scale value other than 1,1,1 in Blender.
The first fix here is to apply the transforms in Blender before exporting. Select the appropriate objects and use the hotkey ‘Control + A’ to bring up the apply menu.
From this menu select Rotation and Scale to revert these values back to their defaults. This does not change the objects visible rotation and scale, as it simply reassigns its current settings as the new defaults.
This step should be taken regardless, but the alternative fix which should also be done is to make sure that the apply transform option is ticked in the export parameters.
Incorrect Orientation
This is a little bit different from rotation, as it represents the actual direction that the object will face in Unreal Engine when the asset is imported. If the orientation is incorrect, the object may face a different direction or have rotational values on any axis other than 0.
The first fix is to double-check the forward and up directions assigned in the export parameters back in Blender. Remember that when exporting to Unreal Engine the forward direction should be X and the up direction should be Z.
The second fix is to adjust the transform parameters when importing your models in Unreal itself after you have selected the models from your file browser.
Parts Of The Mesh Are Invisible
At times you may notice that after exporting a model parts of that model do not appear in your project scene. This is due to a process known as backface culling, where the inside of a mesh is not rendered to preserve memory. The reason why you cannot see parts of your model is because that part is inside out, as all geometry has an inside and an outside.
The term used for this behavior is the normal of geometry. The normal is a line perpendicular to the surface of the geometry and is always on the outside face. It’s what tells an application which side of the geometry to show.
The best fix here in Blender is to first select the entire model, then use the hotkey ‘Alt + N’ while in edit mode to bring up the normals menu.
From the list of options that you see, select the recalculate outside option to fix all the normals of your object so that they are facing the outward direction.
This should fix the issue in Unreal, but there are rare cases where it only reverses the faces that are visible. another solution is to only select the faces that you want to correct, then go back to the normals menu and select the flip option to reverse those faces.
You can learn more about how to identify and fix normals from our article here.
Black Spots Appear On The Texture Of My Model
A common process with static objects is to bake the lighting onto them to create shadows on the texture. The advantage of this is that the shadows are rendered as a part of the texture itself and don’t need to be rendered again during gameplay, which improves performance.
After the baking process, you may notice black smudges appear on the texture that were not there before, but are not the shadows that you baked in using the lighting.
This occurs as a result of poor UV mapping, the process in which a 3D object is mapped out onto a 2D plane to tell your software how to apply a texture.
It is most often caused by having geometry that overlaps other geometry so that they take up the same space on the UV map. This causes shadows to be applied in multiple locations because it’s been applied to separate pieces of geometry.
To fix this issue in Blender, access the UV map in the UV image editor, and look over your map to find any areas where there may be overlaps. You can select faces and islands in the Uv editor and then reposition them accordingly.
Keep in mind that moving the UVs is going to change the look of the texture itself, so make sure to preview the texture in the viewport to see what changes are being made in real time.
Here Are Some Other Articles You May Be Interested In
Thanks for reading the article, hopefully, you found it an interesting read. We have a few other articles that we think you may be interested in…
- How To Import A Model Into Blender?
- How To Export A Model From Blender To Unity?
- What File Formats Are Compatible With Blender?
- What Are Normals In 3D Modeling?
- Can I Learn Blender On My Own?
-
Edge Loops for Hard Surfaces in Blender
Utilizing edge loops for defining crisp hard surface details in Blender.
-
Blender Kitbashing: Complex Shapes Made Easy
Simplifying complex shape creation with Blender’s kitbashing approach.